How to make a doll by hand: step by step master classes of flat and volumetric dolls, photo ideas for beginners
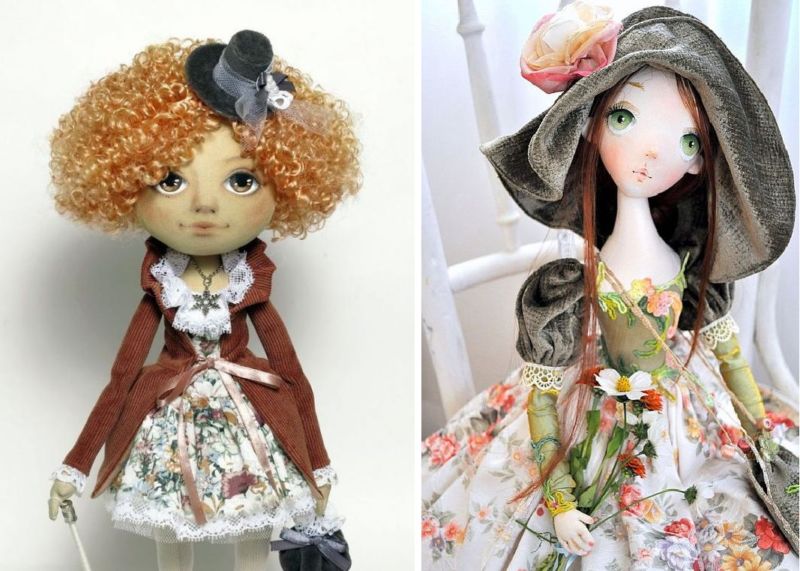
These days, the doll — is not just a toy. It is widely used for interior decoration. Handmade dolls can be a great gift - they are invested with a part of the master's soul!
You can start by making simple dolls, gradually passing to more complex versions.
You should know that the attention will be attracted to the doll in beautiful clothes, with soft hair, with a lovingly painted face and the use of all kinds of decorations.
Options for making dolls with their own hands
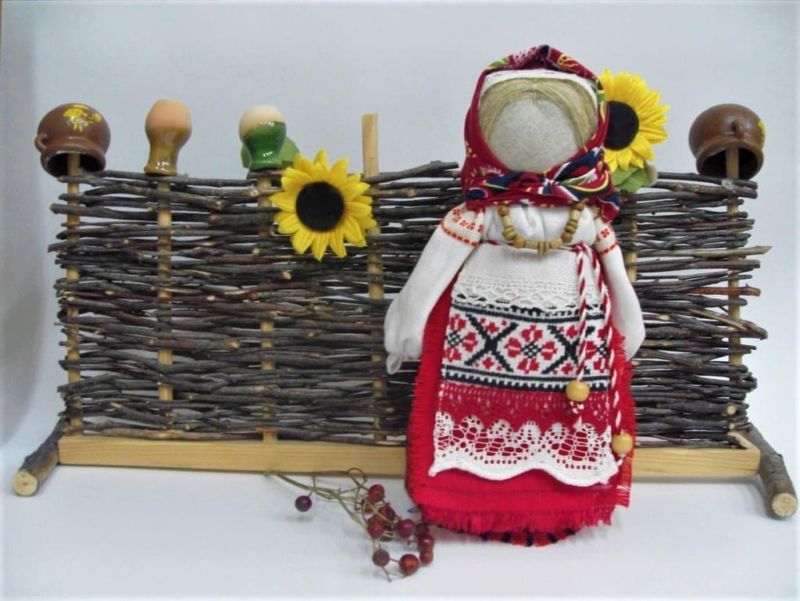
The history of the origin of the dolls is closely linked to the history of human development. A long time ago with the help of dolls carried out various rituals. They were wooden, clay, patchwork or stuffed.
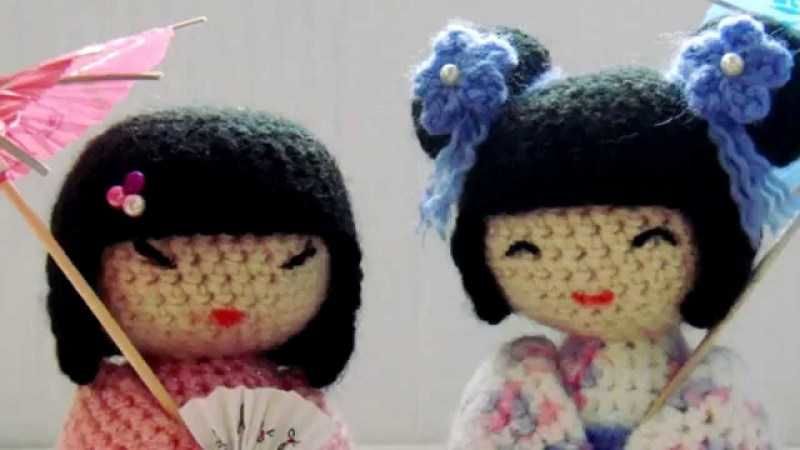
In our time, added toys made of yarn, made of paper, capron hosiery, foamirin and other available improvised materials. There are flat dolls or three-dimensional.
Flat dolls
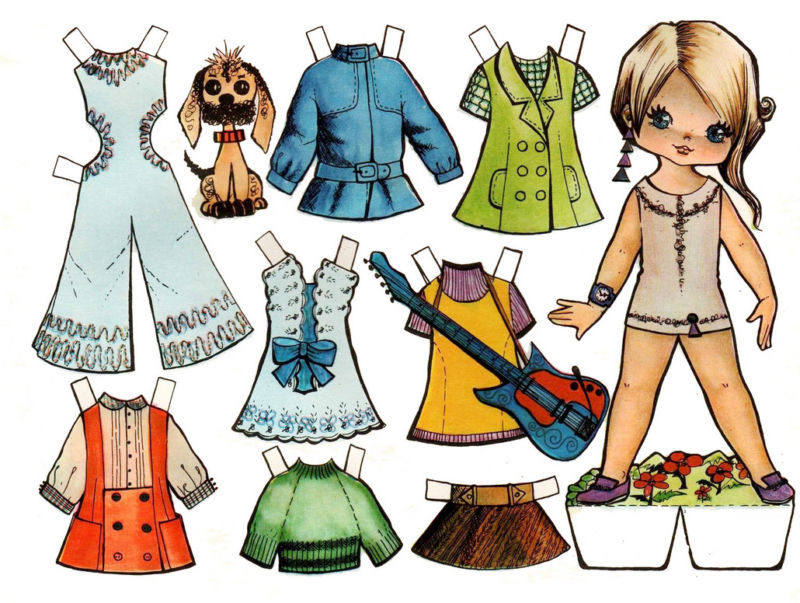
Very funny flat paper or cardboard dolls: "dress up», twitchersPuppets, puppets and others.
These dolls with removable clothing appeared in the 18th century. Very popular they were among the girls in the stagnant era. Nowadays, children also do not refuse to play with such dolls. Their selection of clothing, jewelry develop the children's logical thinking, eye and imagination.
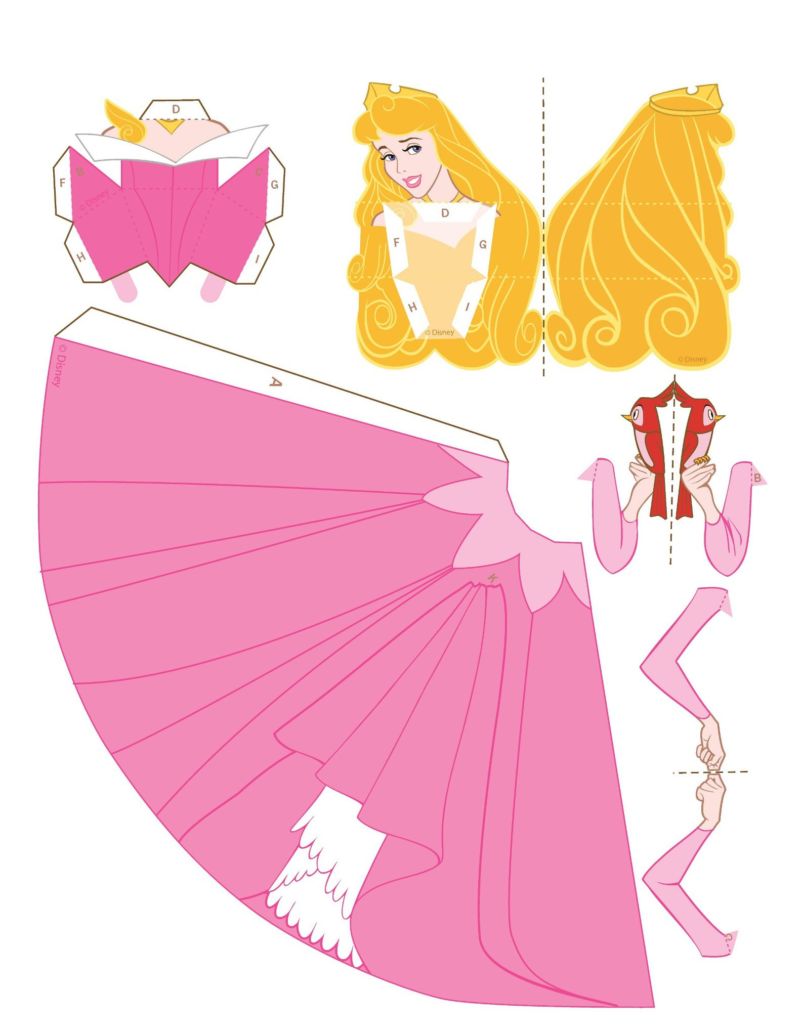
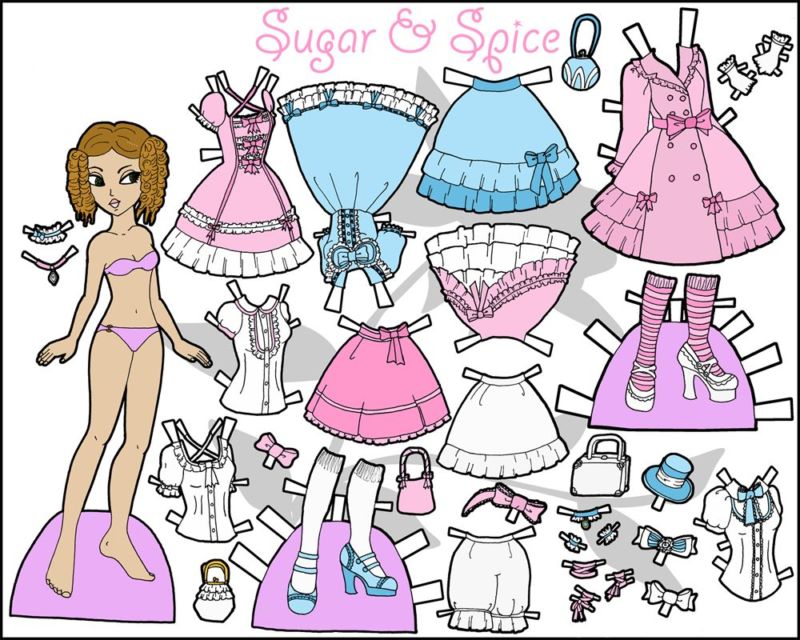
Made of paper
Doll dress up made of paper — is a favorite cartoon character, a famous actress or singer, or maybe a photo model. Find a full-length print of her, preferably in a swimsuit or tight-fitting clothes.
The girl herself or any of the family members can become such a doll. For this purpose, take the corresponding full-length photos.

А maybe it will be Mini Mouse or one of the Little Ponies. The possibilities are endless! Create!
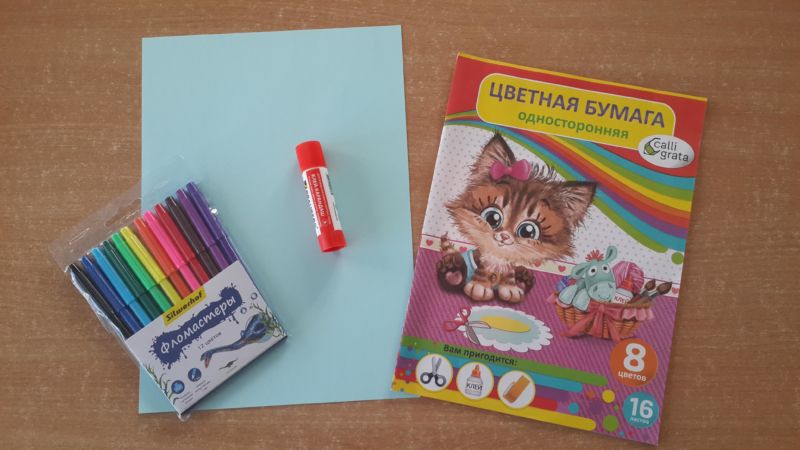
You will need:
- white paper,
- scissors,
- felt-tip pens.
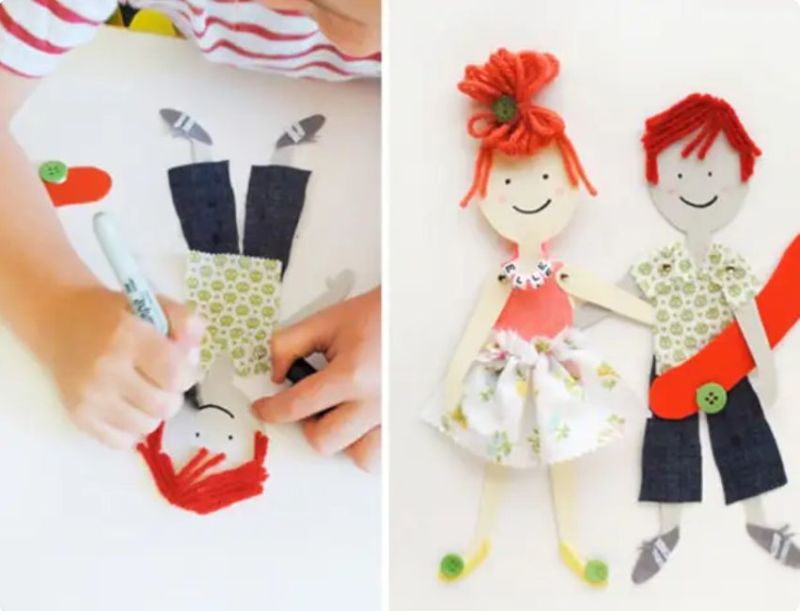
Now let's get to work:
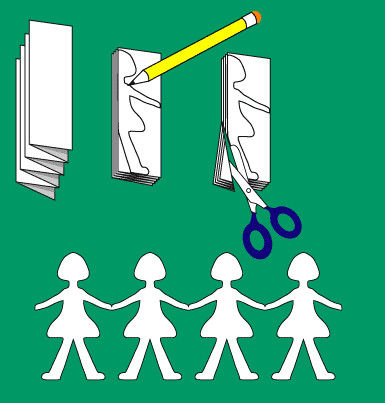
- On white paper, folded in half horizontally, draw half of the figure of the doll. Try to keep the necessary proportions of a person. If you do not succeed, do not get upset: you can imagine that this is a character from popular cartoons for children, where the characters have not quite proportional body parts.
- When you cut and unfold it, you will get a whole figure.
- Paint the doll - the front view with the face and panties.
- Use the cut out base as a template: trace the outline on paper and cut out the doll. Paint the back view with hair and panties.
- If you drew the doll with felt-tip pens on glossy paper, let the workpiece dry a little, or or The picture can be smudged.
- The halves should be carefully glued together.
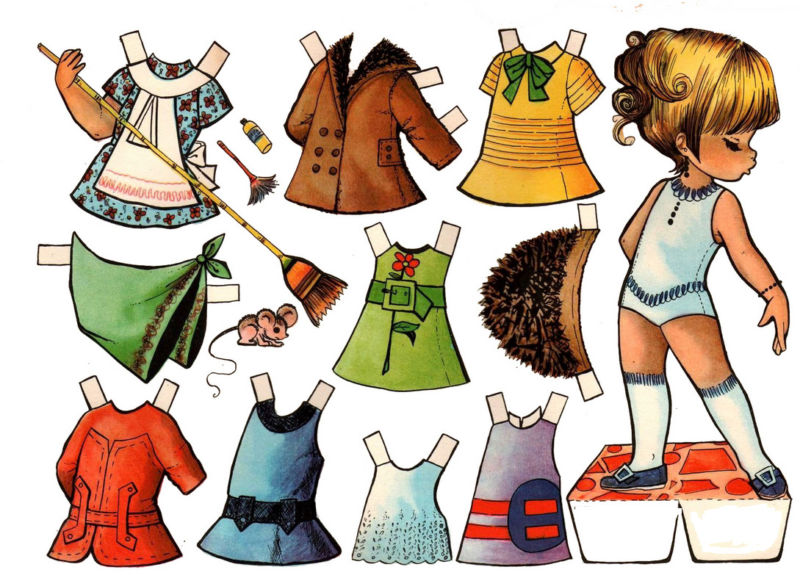
- Pieces of dolls, attach them to a sheet of paper and trace its thin lines with a simple pencil. If you do a whole closet for the doll, trace it several times.
- Now, the resulting contours can draw any style of clothing for different seasons.
- Each piece dorischete flaps on the shoulders, forearms, waist, thighs, shins. Clothing should be firmly attached to the doll figure.
- Color and decorate dresses and costumes. Cut them out and dress up the doll.
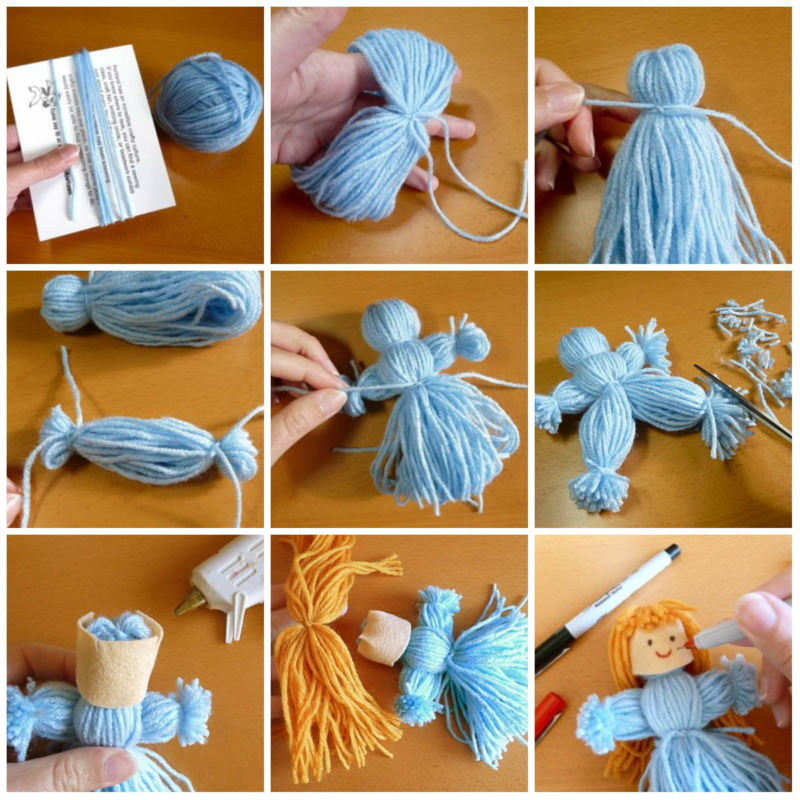
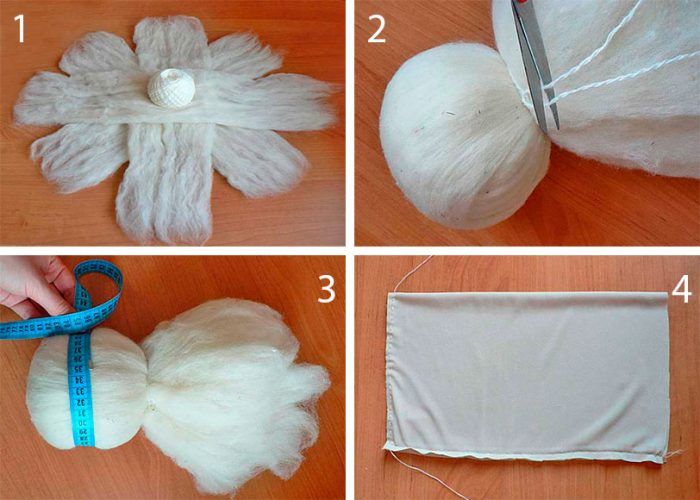
- Use an awl to poke holes in the doll's head above the face.
- From the individual strands of yarn, gather the hair of the desired length: boys short, girls long.
- Tie them in the middle with the same thread.
- Tie them to the head at the top and sides.
It is better to cut clothes for such dolls from paper. It will be more firmly held with the flaps. You can also make these dolls with hair from yarn of different colors.

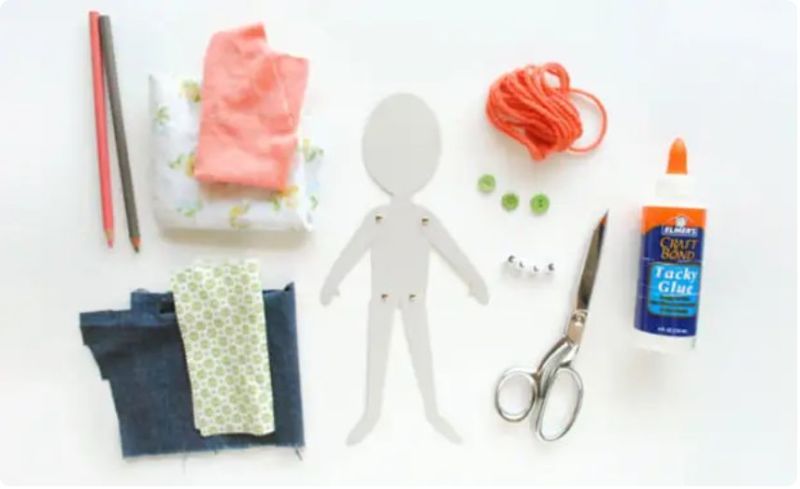
From cardboard
We will need:
- colored cardboard;
- A narrow ribbon;
- a simple pencil;
- felt-tip pens;
- glue stick;
- awl;
- kapron thread;
- scissors;
- polymer cord;
- instant glue or glue gun.
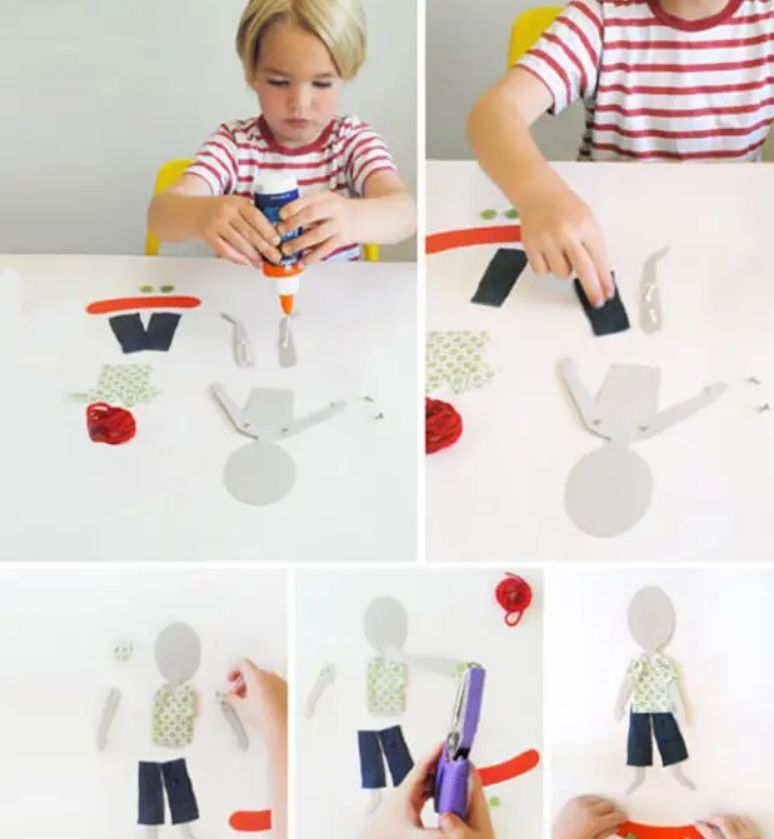
Step by step description of the process:
- First, we will prepare the cardboard parts. The color of the cardboard will depend on the type of animal and your imagination: bunny — gray or blue, a bear cub — brown, a kitten — The brown bunny, the brown bear cub, the kitten in white, black or gray, etc.
- On the back side of the colored cardboard with a simple pencil draw the body of the animal in the form of an oval (you choose the size).
- Draw a circle to it — A head with triangular ears for a cat and semicircular ears for a bear. — for a bear, with long — for a bunny, etc.
- In proportion to the torso we draw four small ovals — These will be their back and front legs.
- All cut out. Carefully pierce with an awl or the sharp end of scissors holes for fasteners at the top of the legs, as well as in the appropriate parts of the torso, where we will mount the legs. The diameter of the holes will depend on the type of fasteners.
- On the feet just above these holes we will puncture small holes to bind them with string.
- To fix the legs, you need to cut 4 pieces of white polymeric cord of such length at which you can tie knots on it on both sides.
- Connect the cord torso with paws. Tie knots on the front of the toy.
- Next tie the legs in two (separately upper and lower) with kapron thread through small holes. If the thread is stretched — Feet hang down.
- A long thread with which we will pull our toy, for strength, folded in half, tied to The middle of the two threads connecting the legs.
- The edges of the polymer cord on the underside of the toy are tied in knots. The ends of the knots can be melted with a lighter or burning match. Check the freedom of rotation of the paws.
- To have the legs and arms of the toy to move you can attach them with buttons, wires, etc.
- Then cut out two cardboard circles 2.5 cm in diameter. Between them we glue the end of the thread. It is convenient and aesthetic to attach a large bead.
- Narrow ribbon in the form of loops glued to the top of the head from the wrong side with a cardboard circle of small diameter.
- Draw a muzzle and paws with felt-tip pens. Or decorate them separately drawn and cut out parts by gluing them to the base.
Twitch made of cardboard is ready!
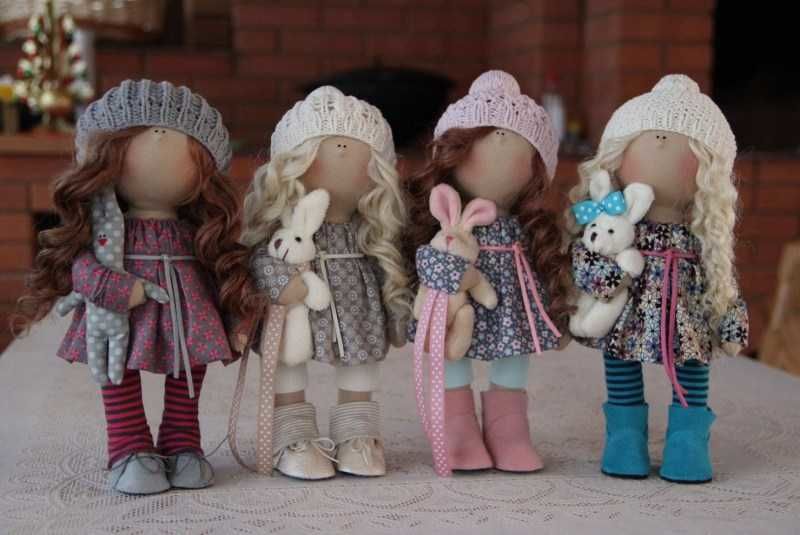
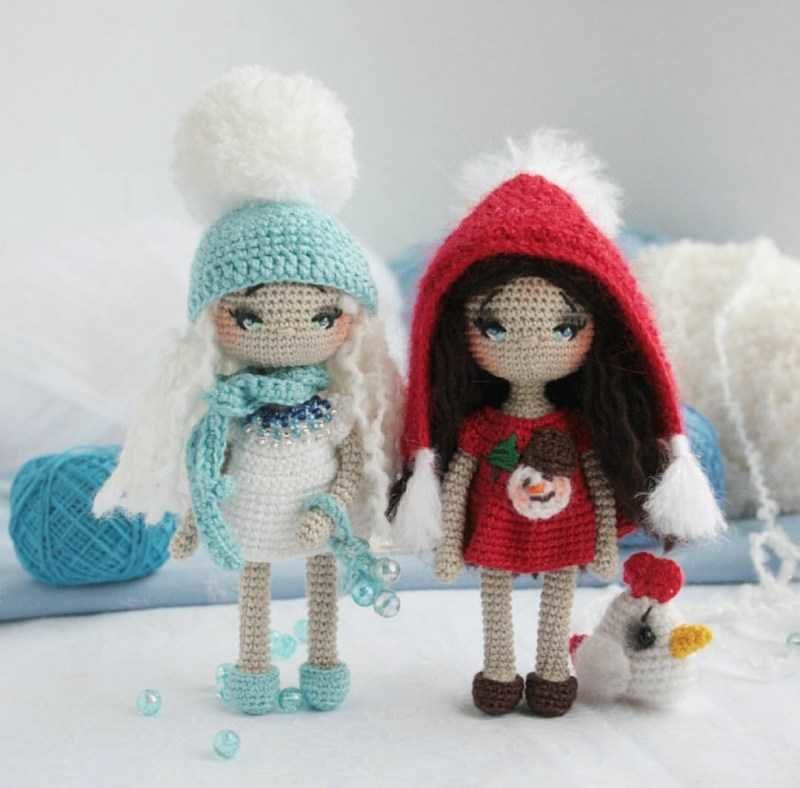
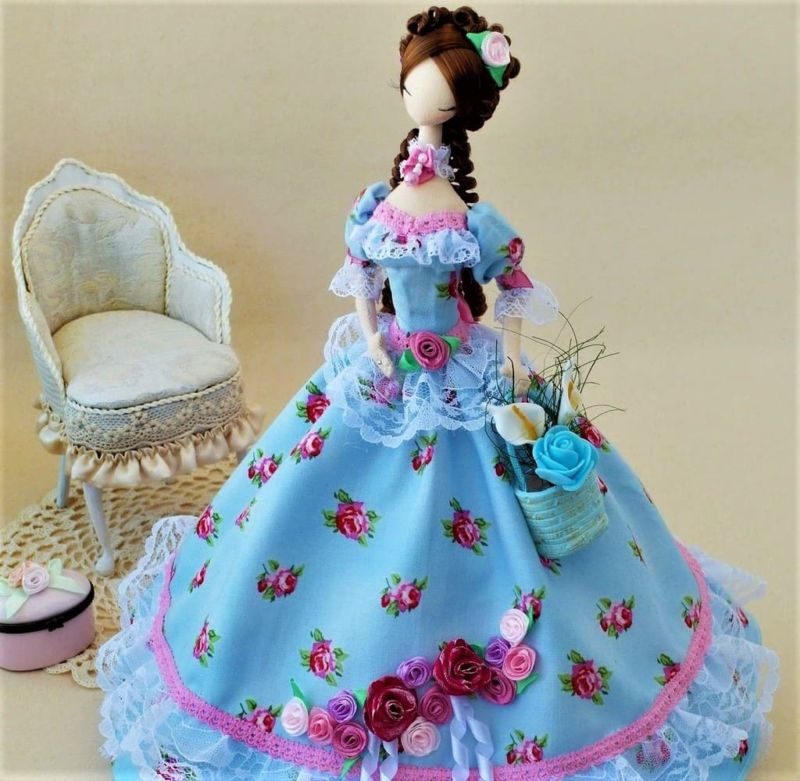
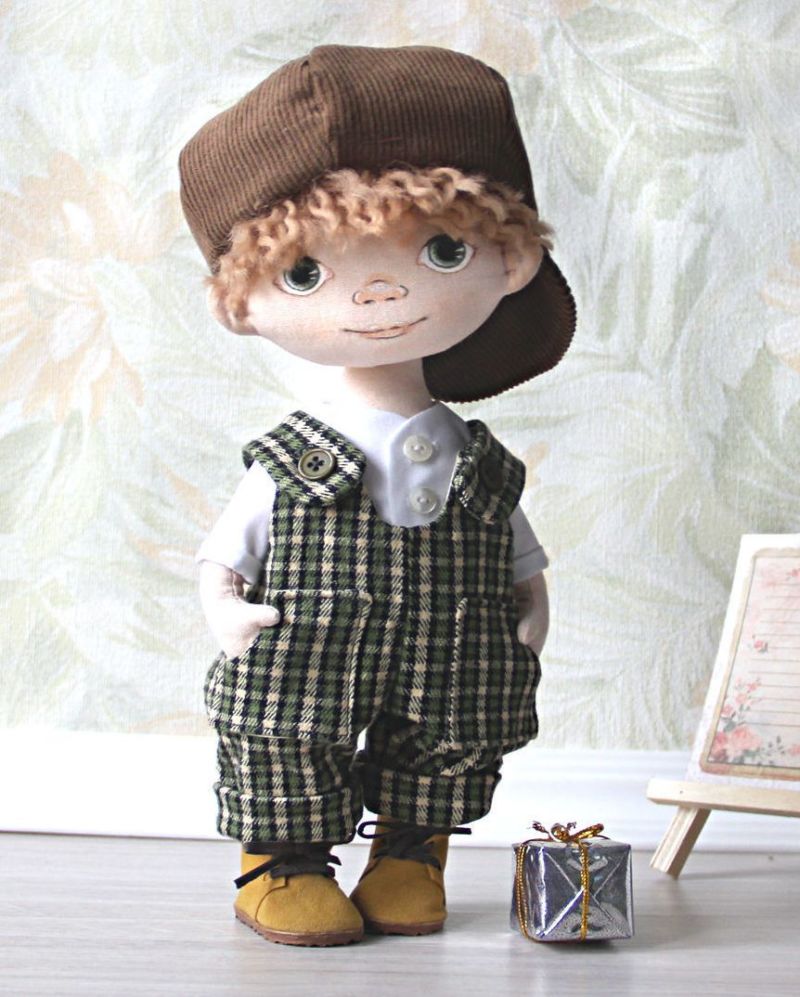
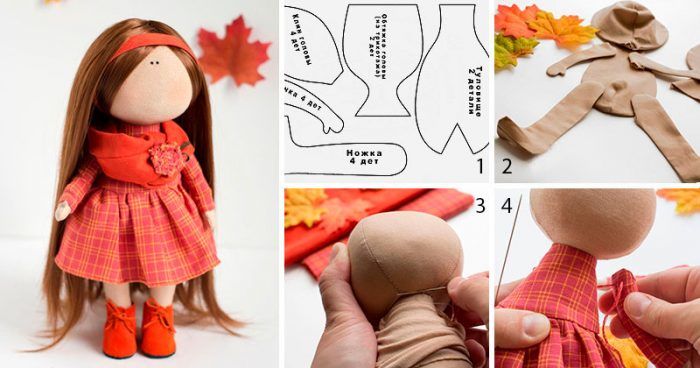
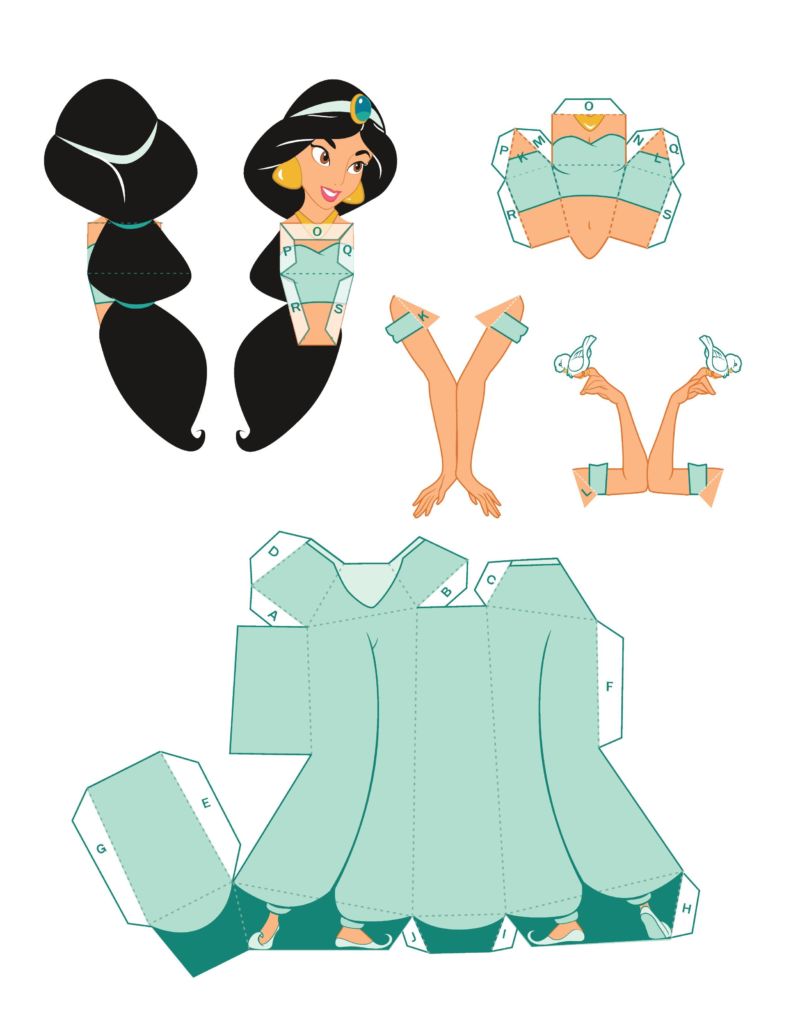
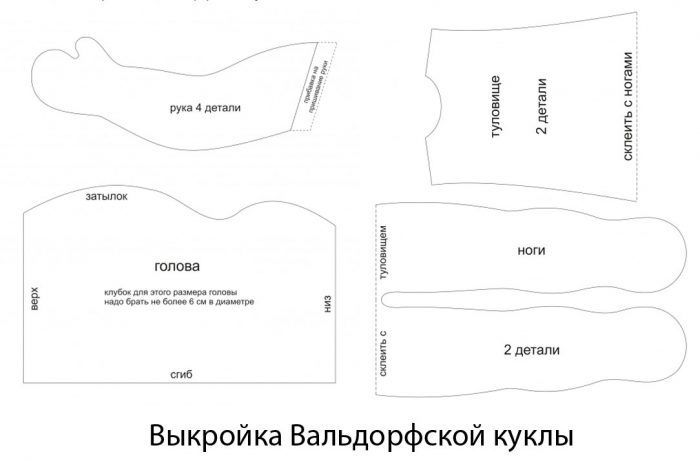
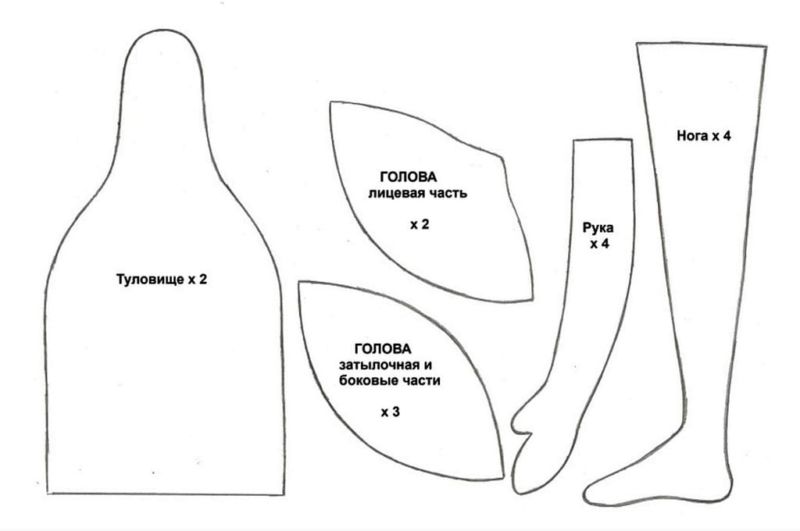
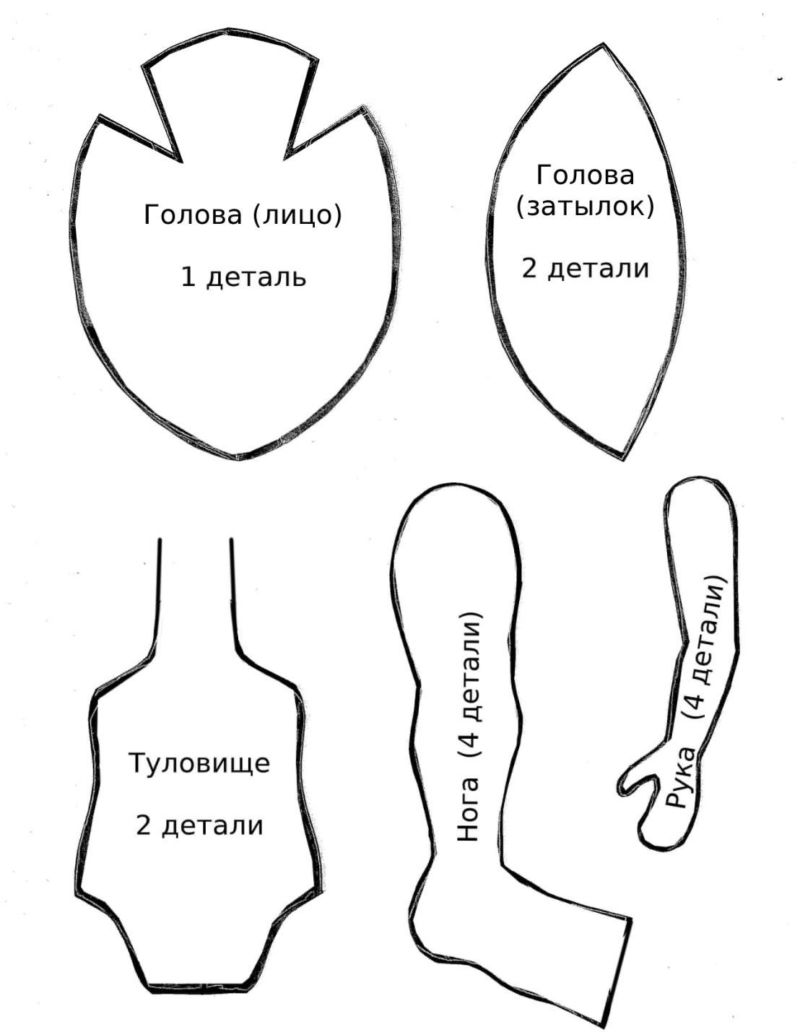
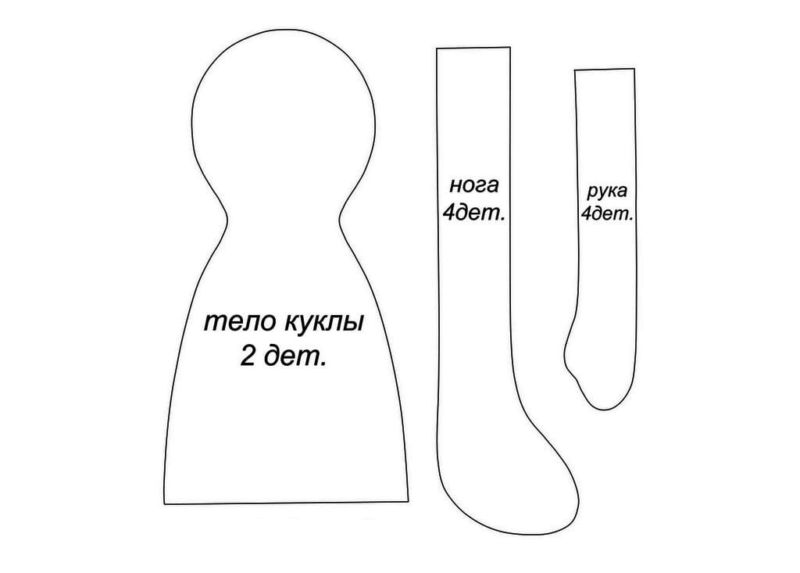
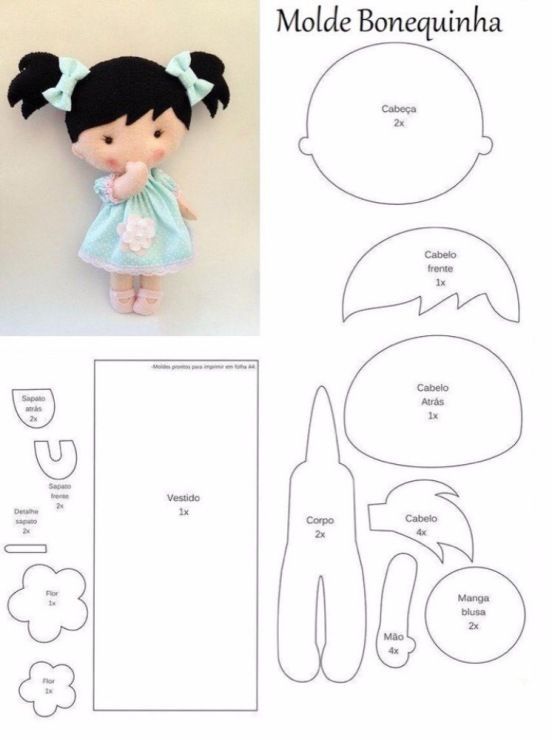
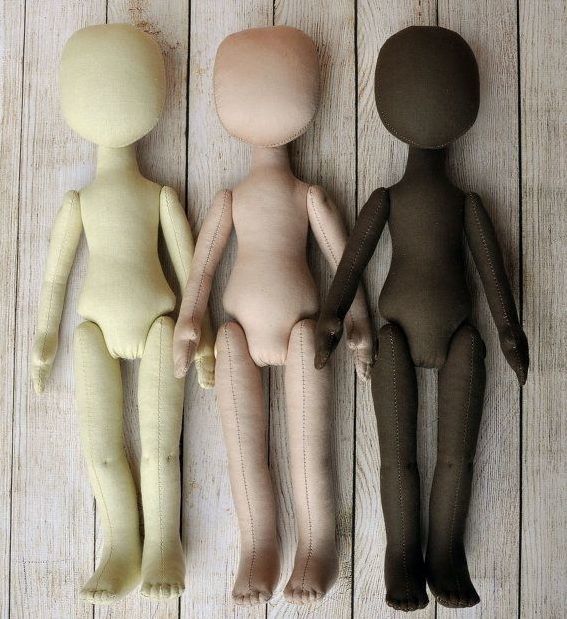
Dimensional dolls
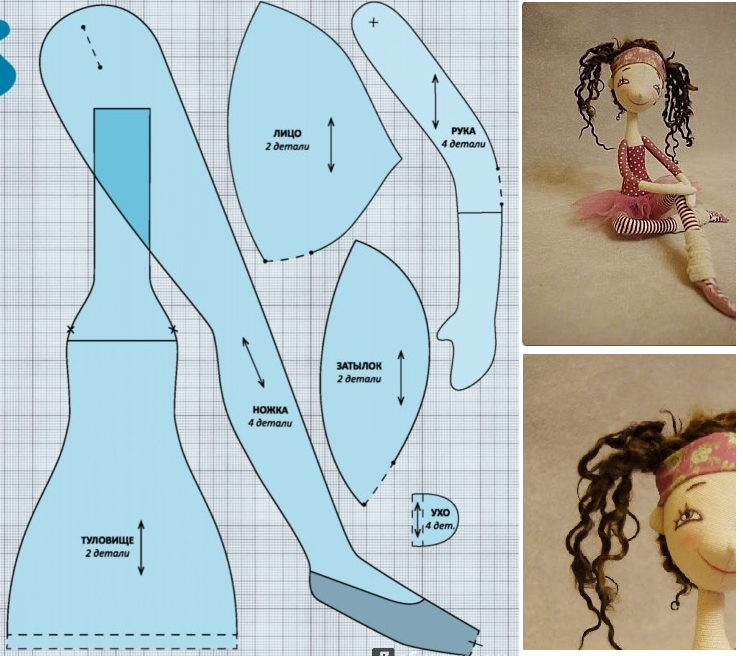
Make a three-dimensional doll is not difficult, especially with good patterns. From the same patterns it is possible to sew a variety of options for toys.
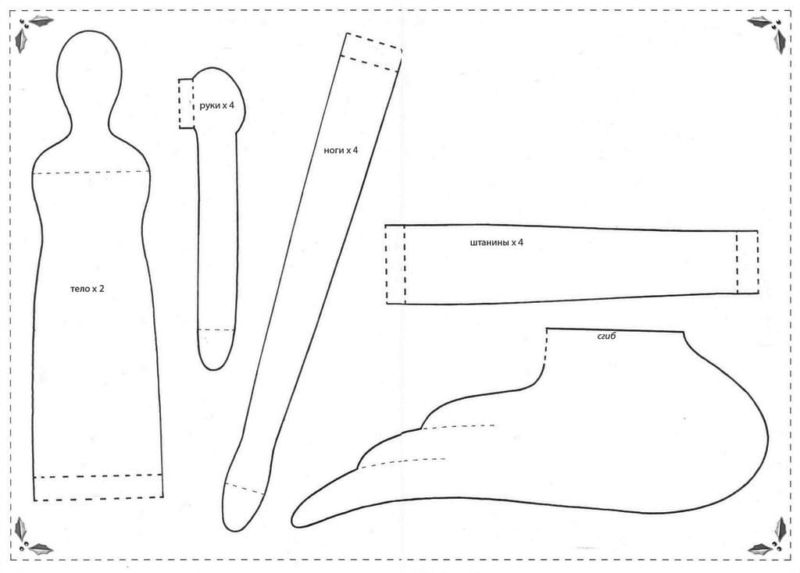
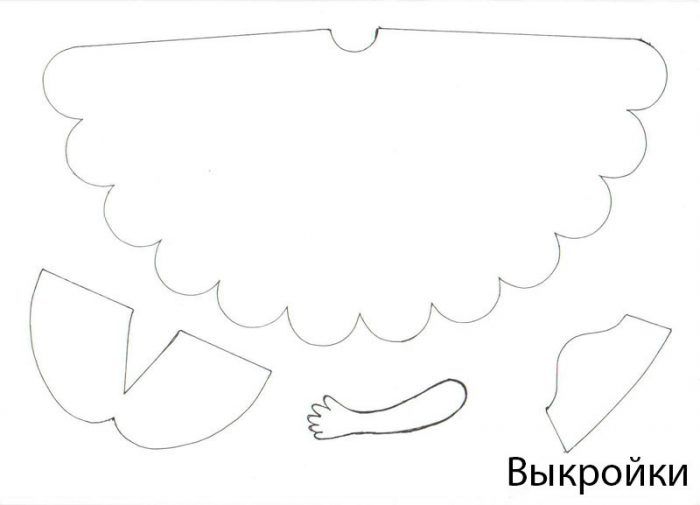
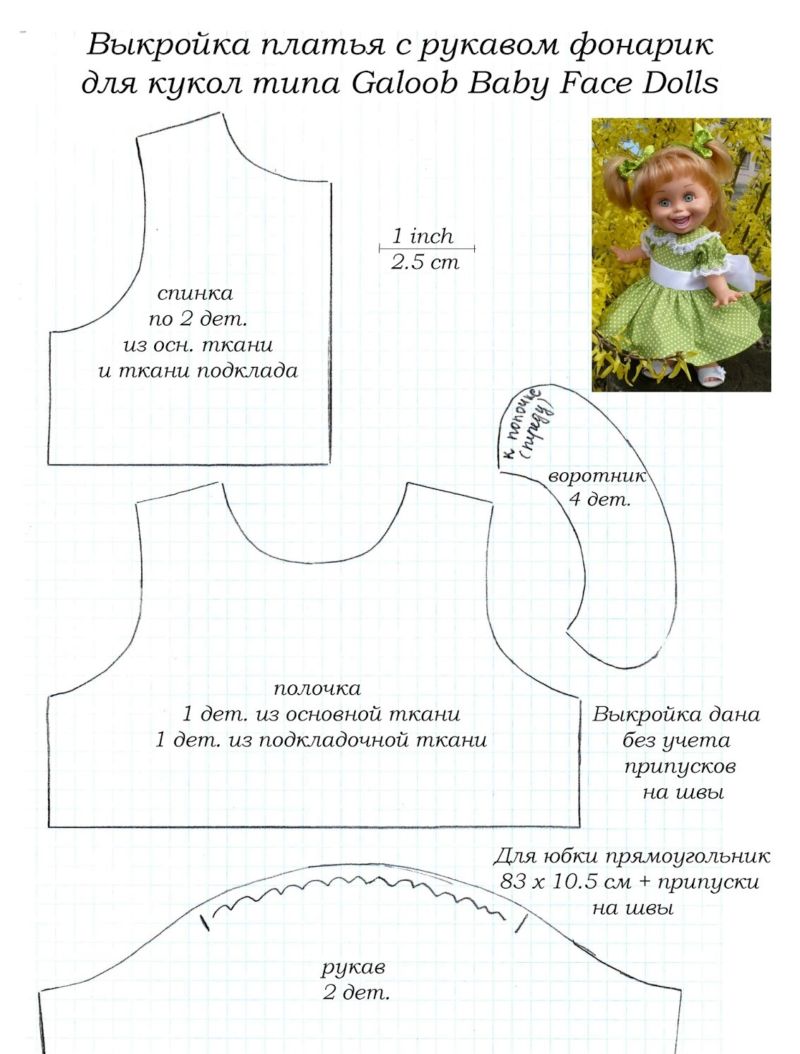
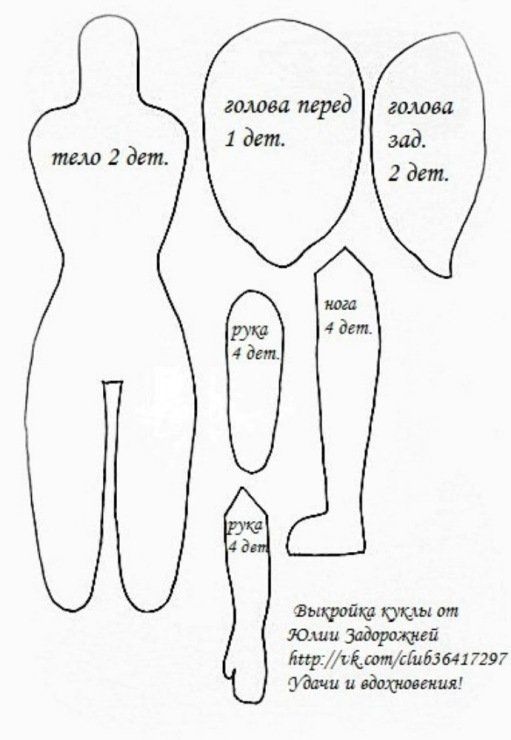
Patterns for sewing dolls at home
Such patterns can be drawn yourself. The size of the pieces is determined by the size of the doll you want to make:
- Small parts (arms, legs, clothes) should be commensurate with the main parts (torso, head).
- Patterns can be drawn on thin paper or on cardboard. The former will have to be attached to the fabric with pins.
- Patterns are attached to the wrong side of the fabric.
- It is necessary to leave seam allowances, i.e. to outline the pattern a little larger in size.
- Dotted lines can immediately mark the places that do not need to be stitched.

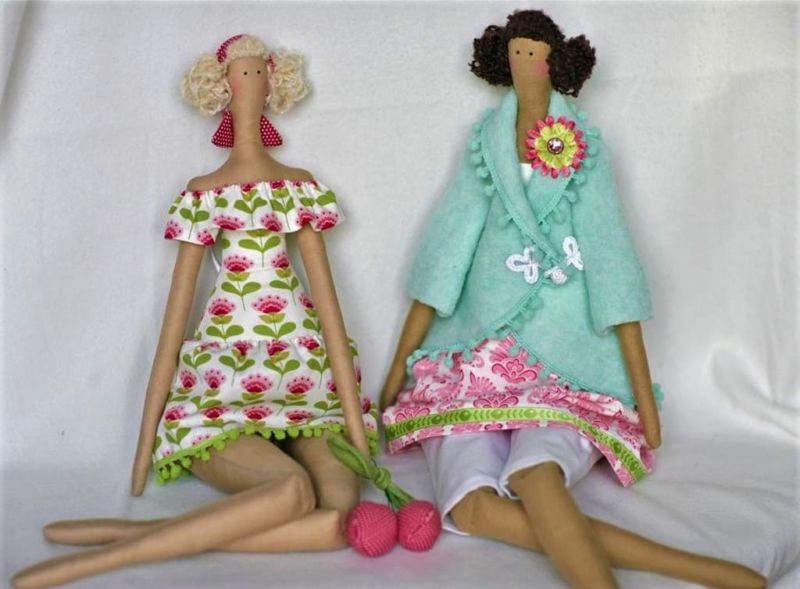
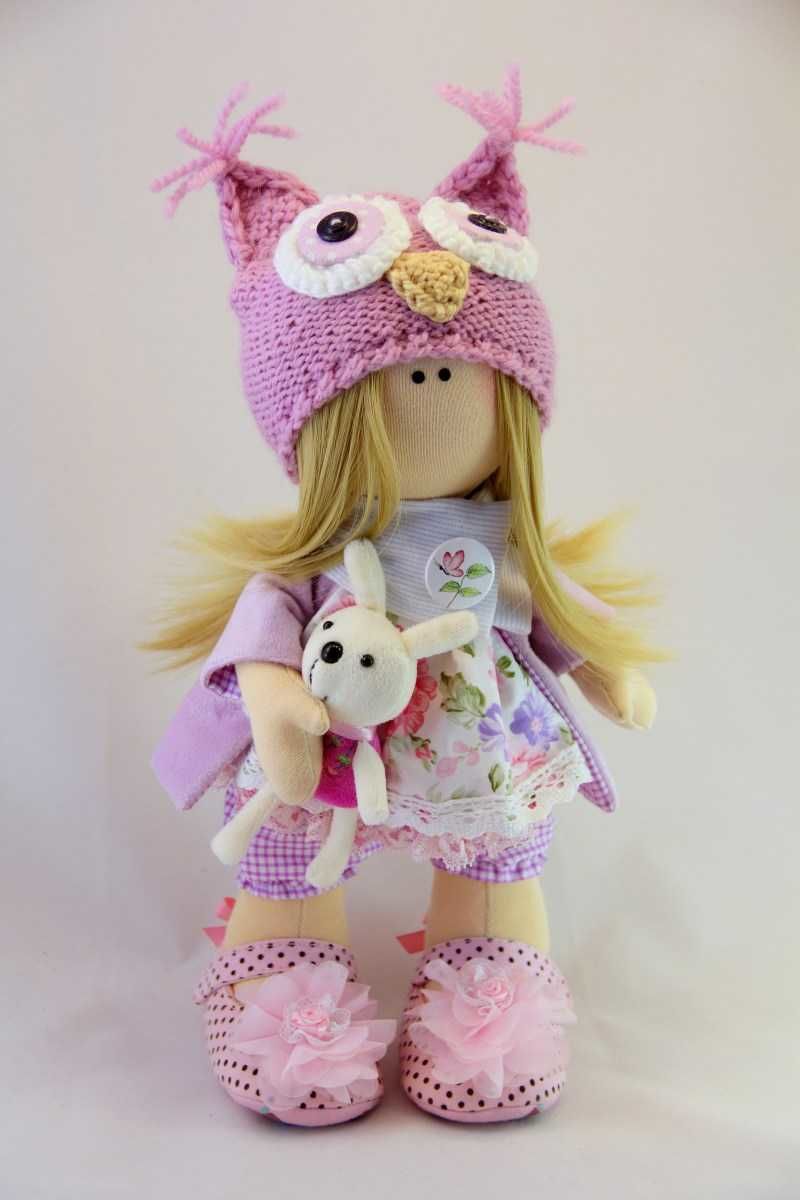
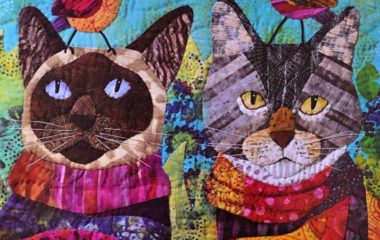
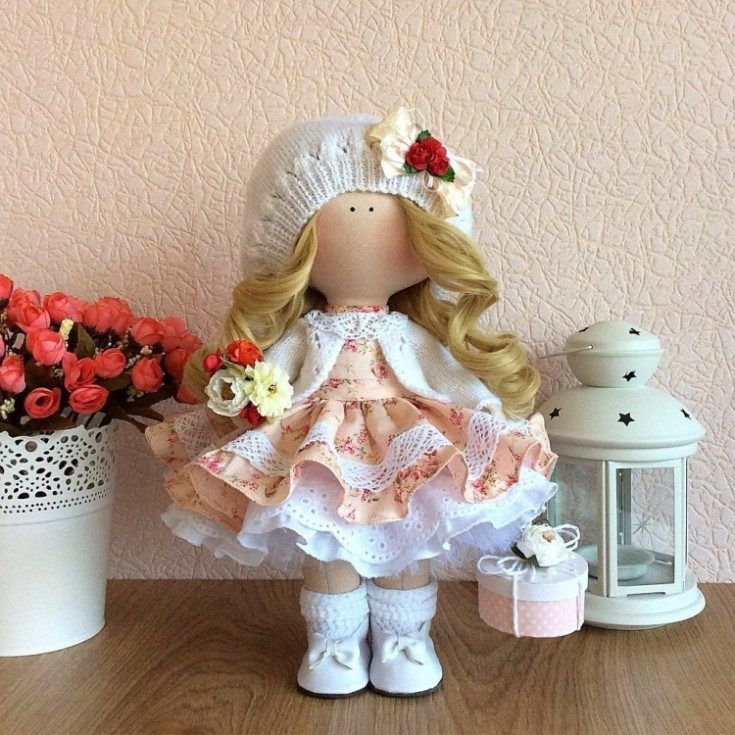
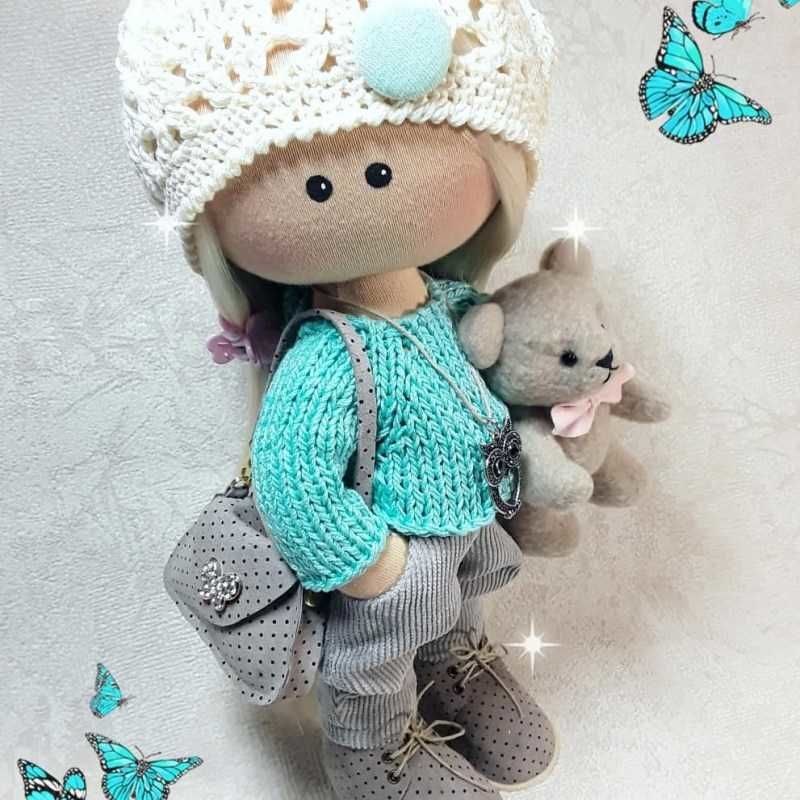
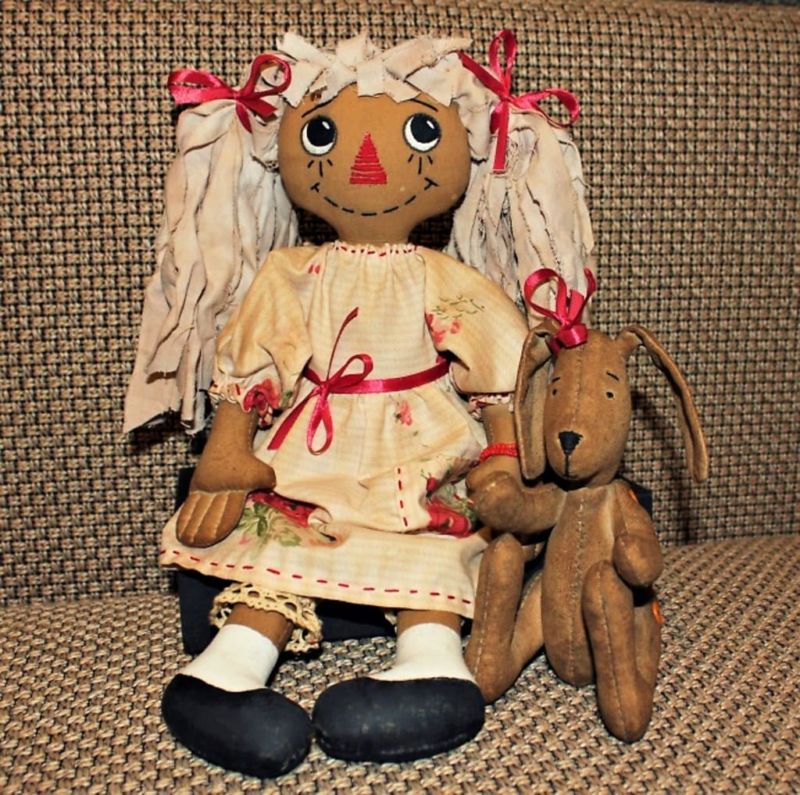
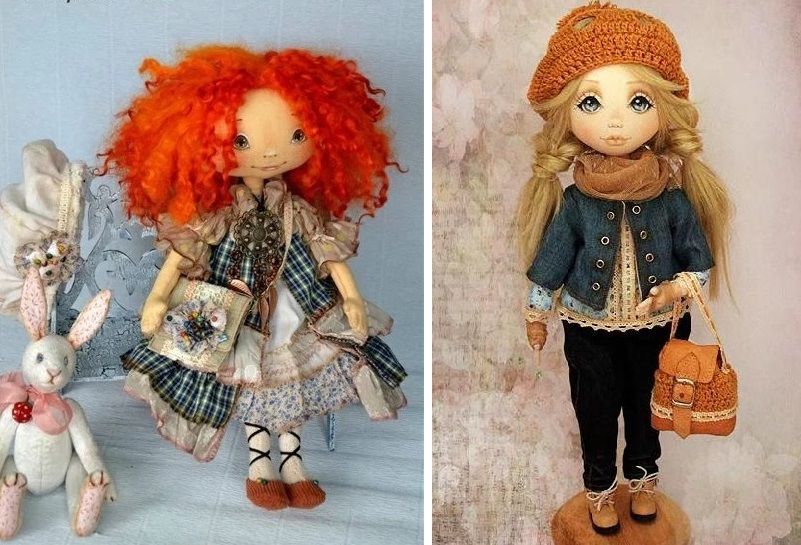
Made of fabric
The most common dolls — made by themselves out of fabric. Many kinds of fabric, so the dolls come out very diverse. Such handicrafts are quite durable and easy to care for.
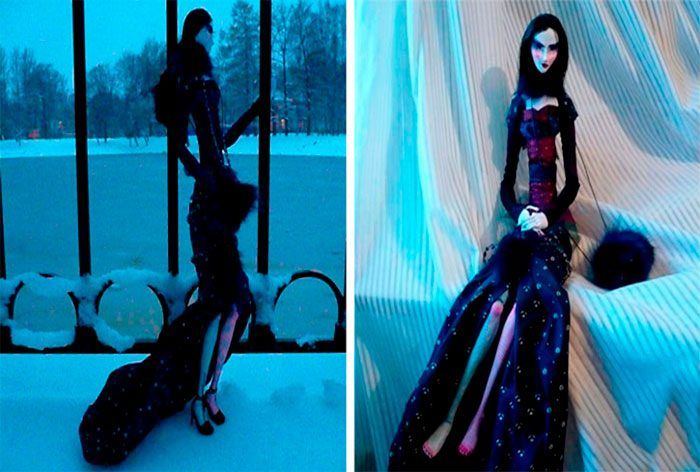
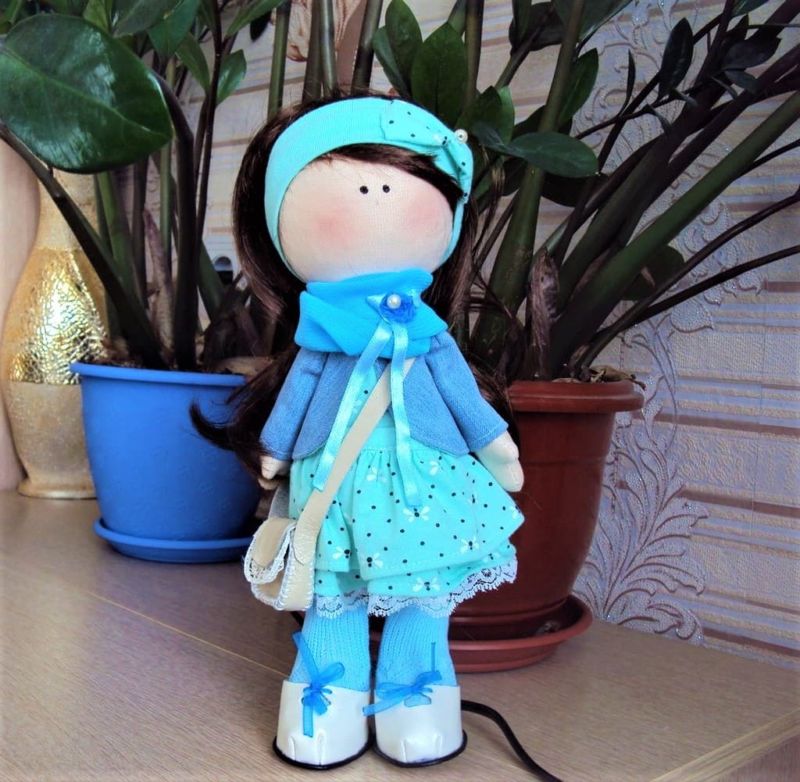
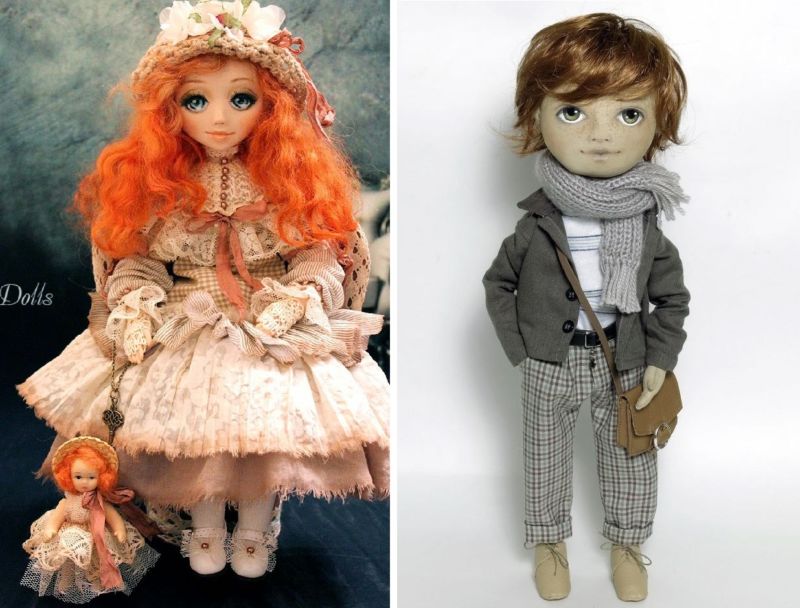
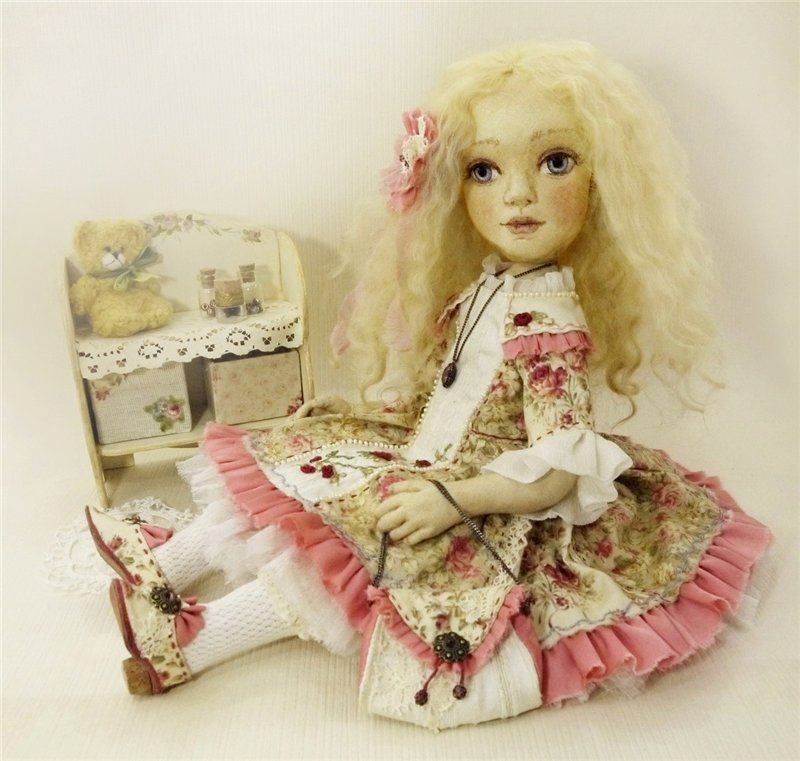
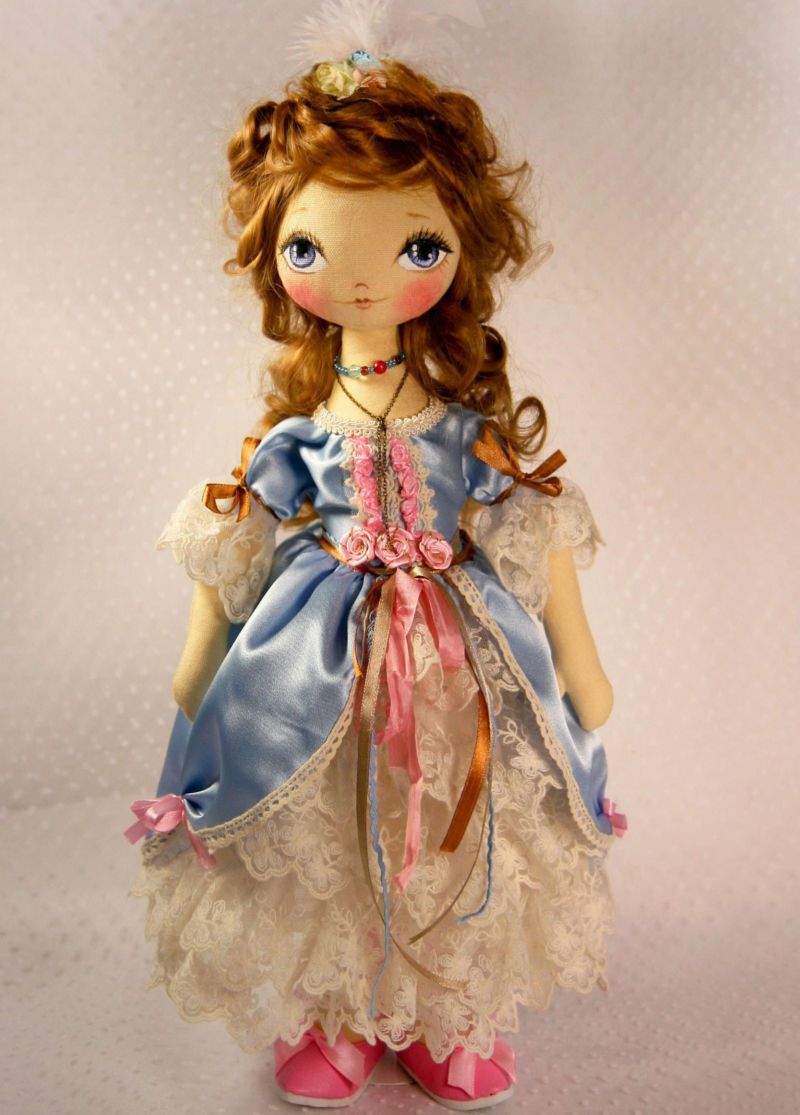
Frame doll
You will need:
- pieces of wire made of steel,
- PVA glue,
- glue gun,
- scissors,
- plasticine,
- newspapers,
- box cutter,
- sandpaper,
- pliers,
- absorbent cotton or sintepon for filling,
- thin fabric,
- thread,
- dense fabric,
- sewing needle,
- acrylic paint,
- small remnants of fur,
- hairspray,
- satin ribbon,
- velvet cardboard,
- artificial eyelashes,
- shoelaces,
- toothpicks.
Work algorithm:
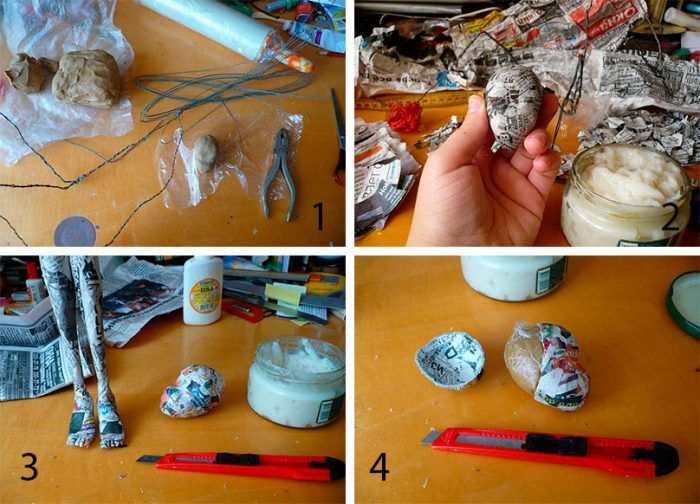
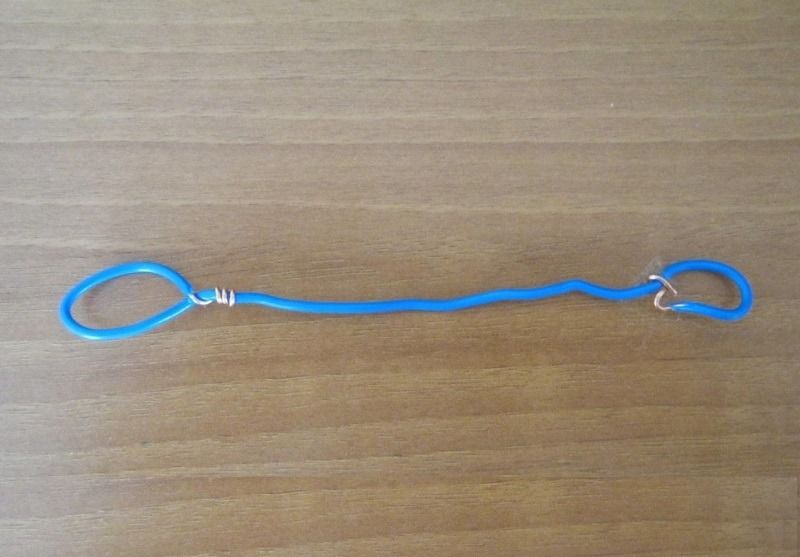
- First, from the wire, construct a frame according to the size of the dolls. While twisting, add 8 cm to the length of the neck and 5 cm to the length of the arms.
- Mark on the frame where the elbows and knees of the doll will be.
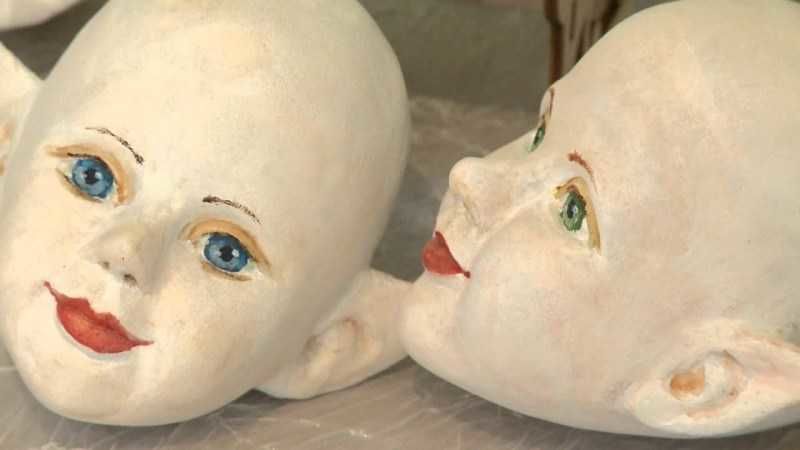
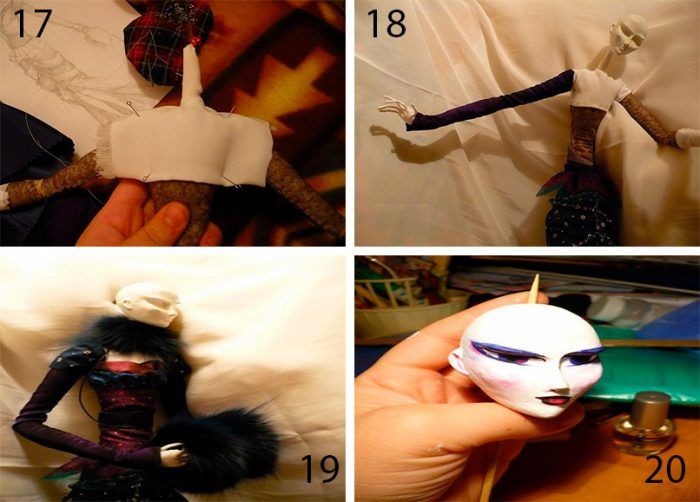
- From the plasticine, form a ball — head. Shape a nose on it, slightly stretching out the plasticine on one side in the center. Place 5 layers of papier-mache on the ball: tear newsprint into small pieces, PVA glue diluted with water 1:1. Dip each piece of newspaper in the diluted glue and glue them completely doll's head. Let the previous layer be sure to dry.
- Do the same with the legs. Dry well.
- Divide the papier-mache head with a box cutter into two equal parts so that one part has a spout. Remove the plasticine. Glue the halves together.
- Use sandpaper to make the legs and head smooth.
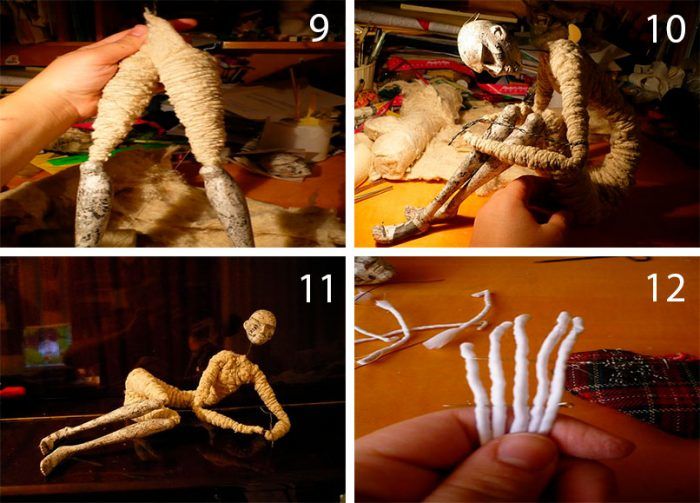
- Wrap the frame with synthetic fabricWrap the skeleton with synthetic fibers, securing with threads.
- From 5 pieces of wire make a palm with fingers. Wrap them with fabric. Another hand do the same. Attach them to the frame.
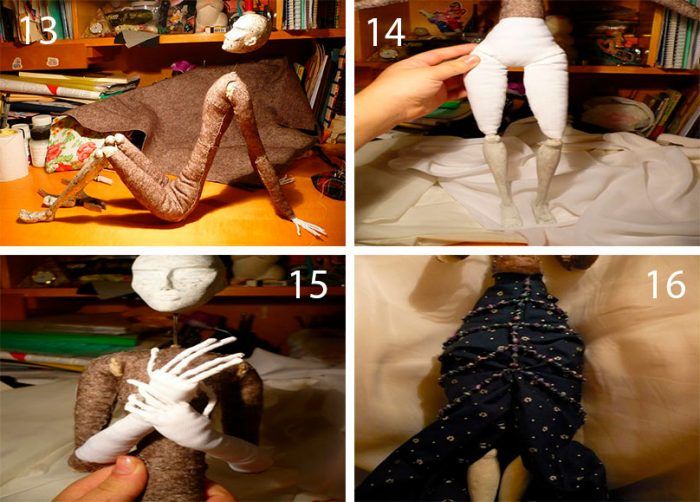
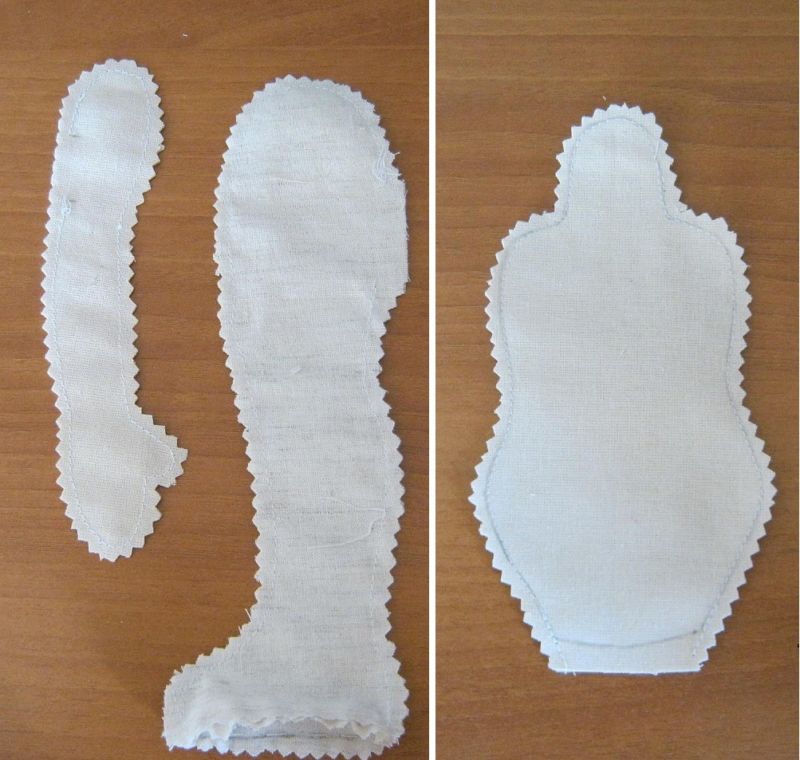
- Stitch the arms and legs of the doll with dense material.
- Paint them with acrylic paints.
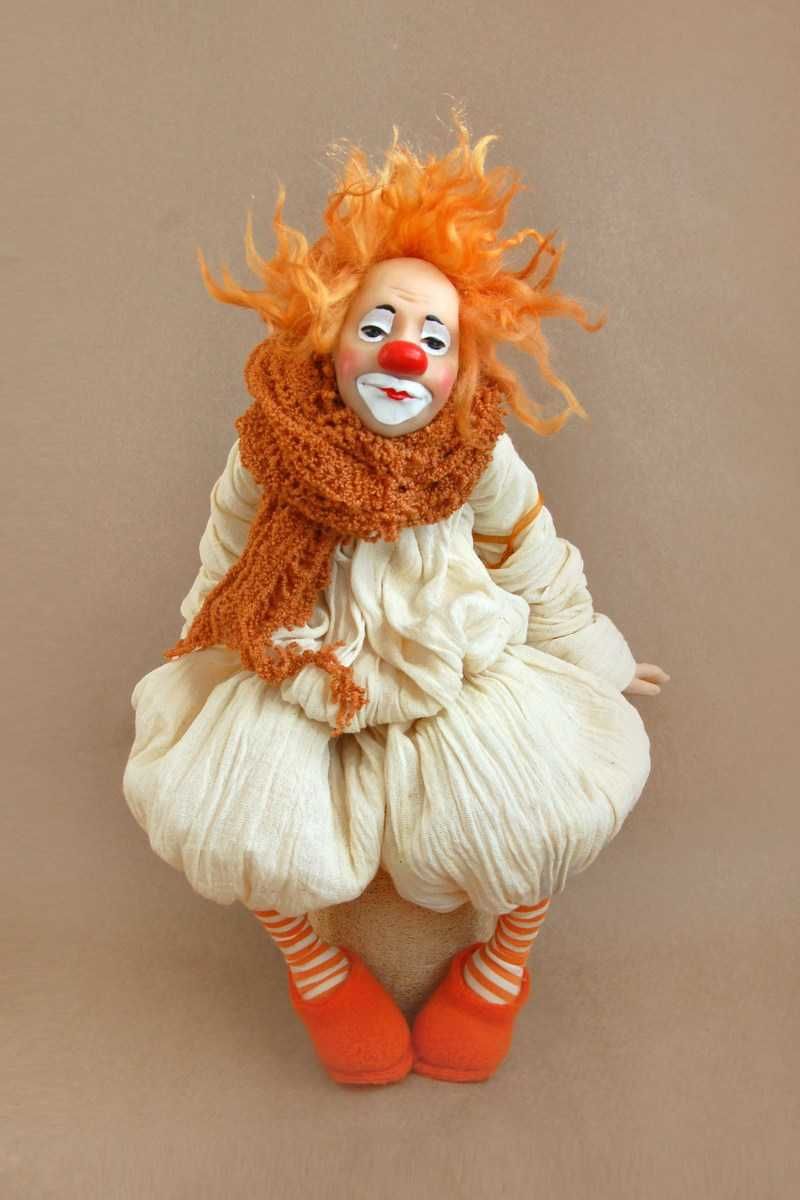
- Make out of thin fabric clothes: wrap body below, put on shoulders.
- Decorate the dress with a collar and side patches of fur remnants.
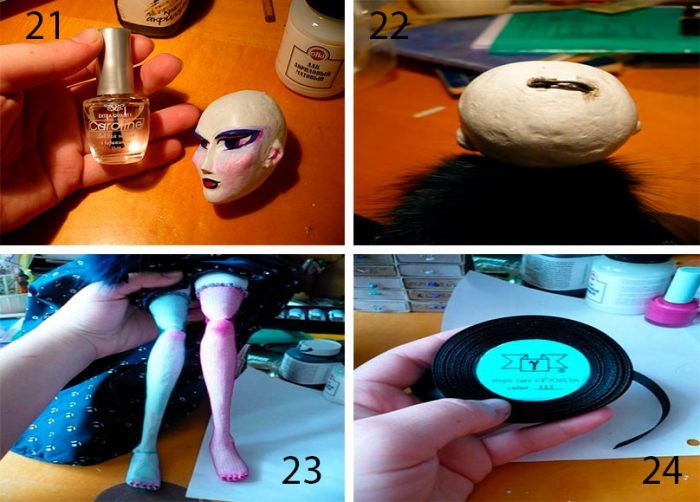
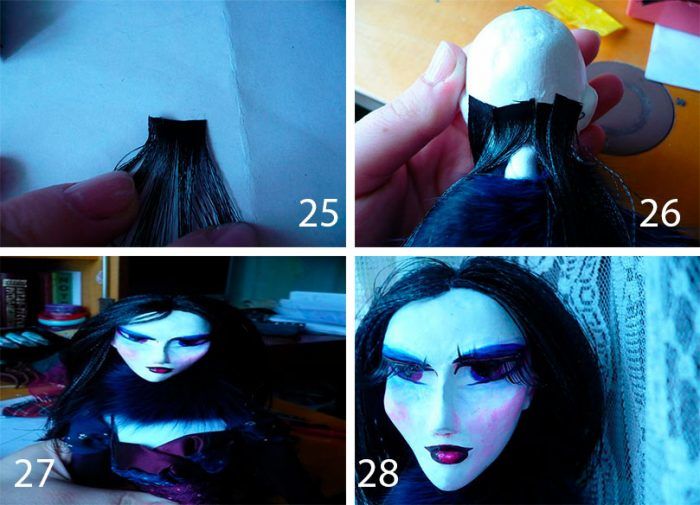
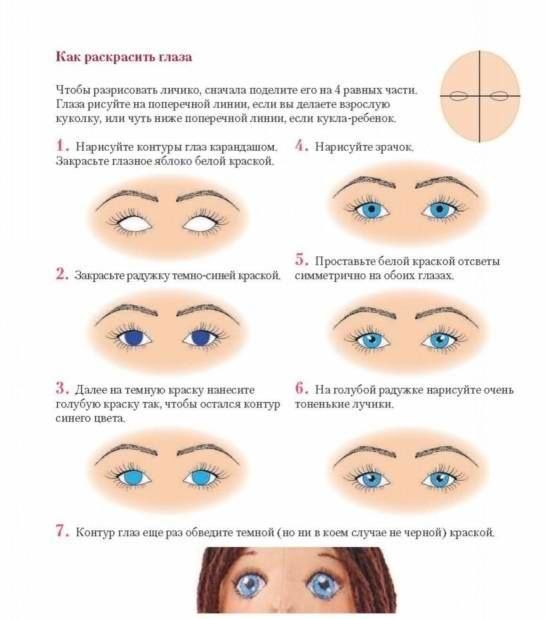
- Draw a face, let it dry.
- Polish the dried elements: head and feet.
- Put doll stockings on the legs.
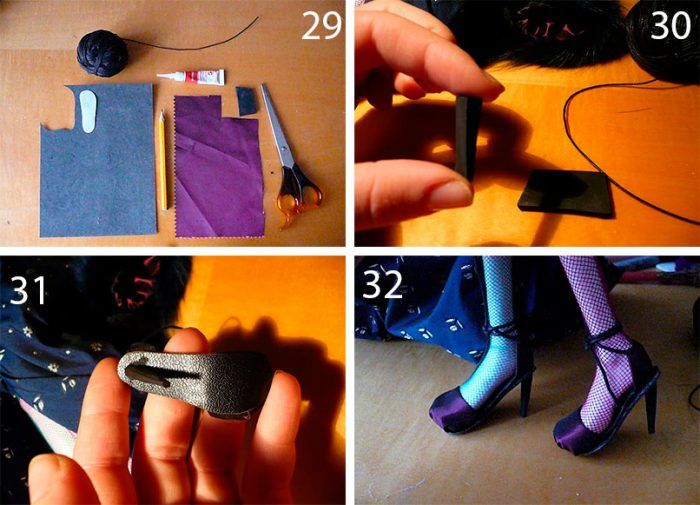
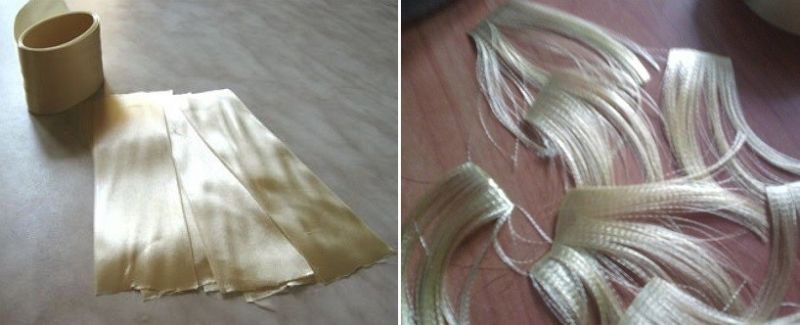
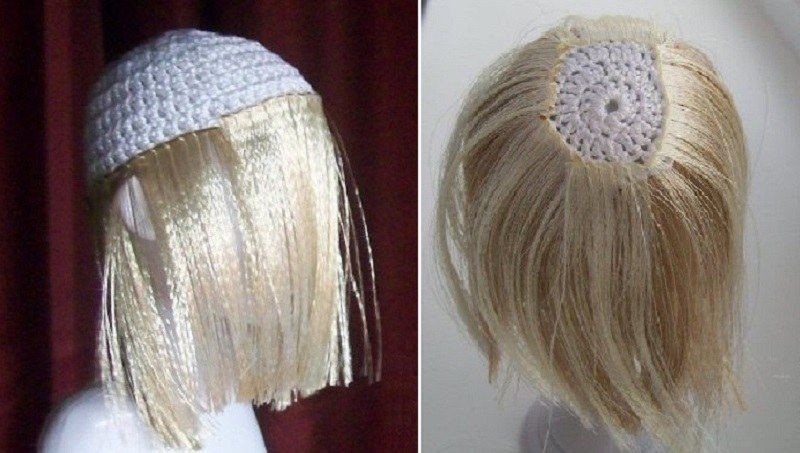
- Create hair from loose pieces of satin ribbon 5 mm from the edge. Using a glue gun, attach them in a few rows to the back of the head.
- Make eyelashes.
- Glue velvet cardboard shoes, attach laces to them.

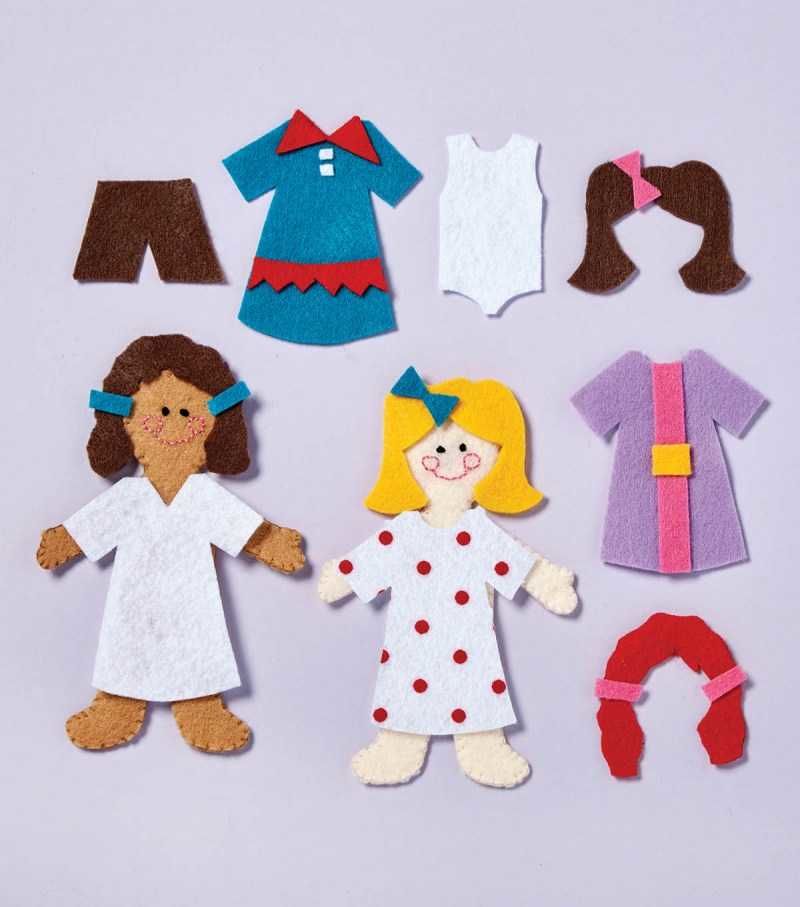
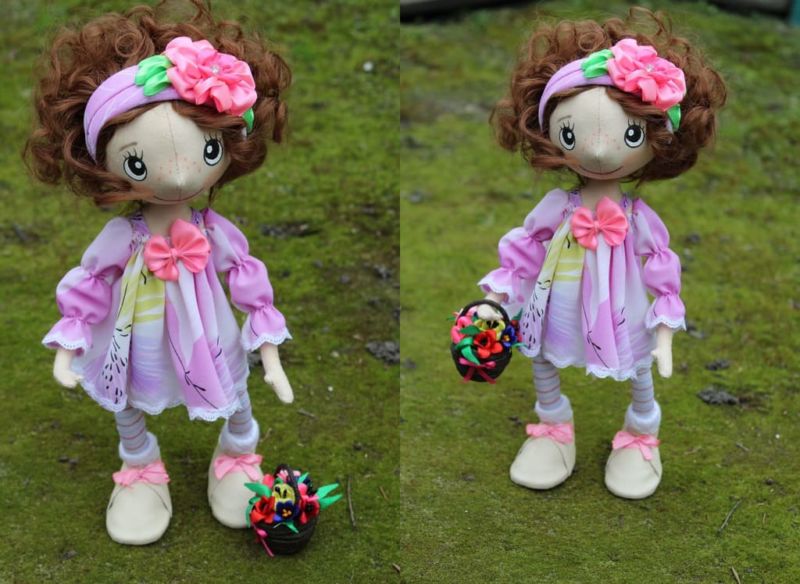
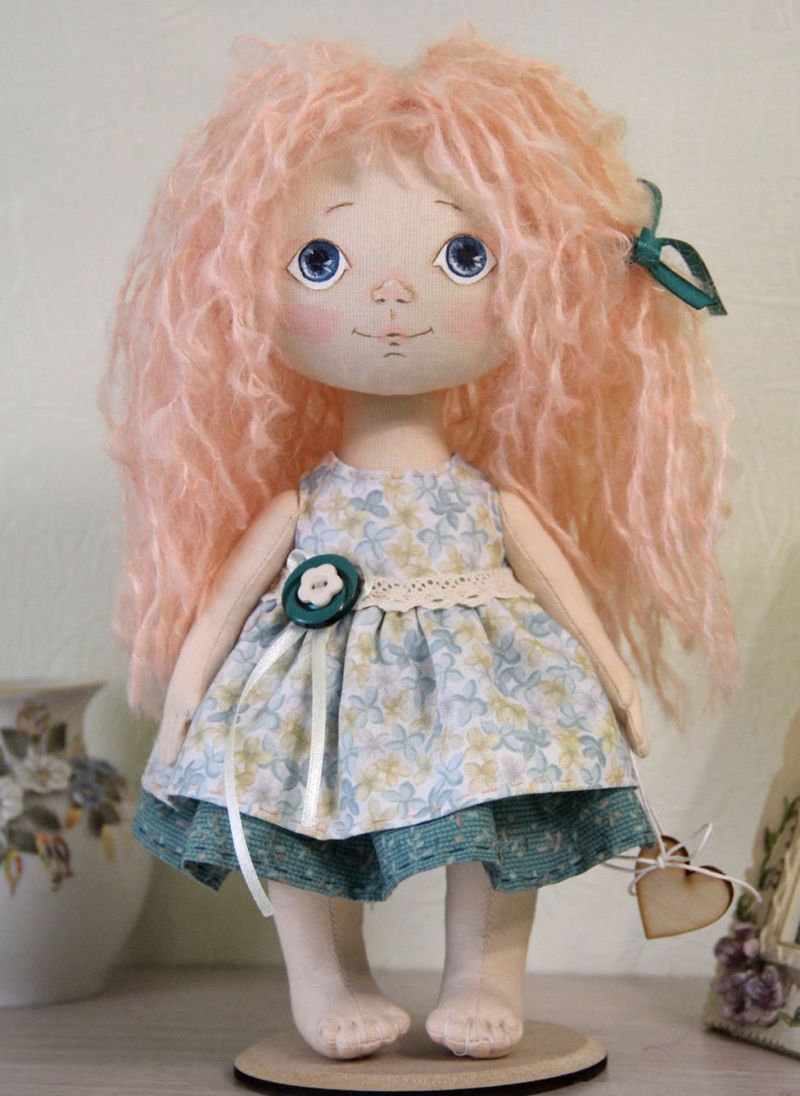
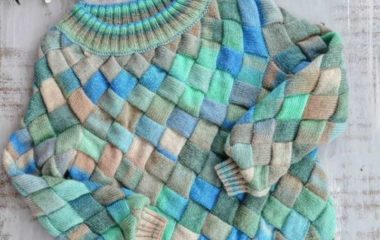
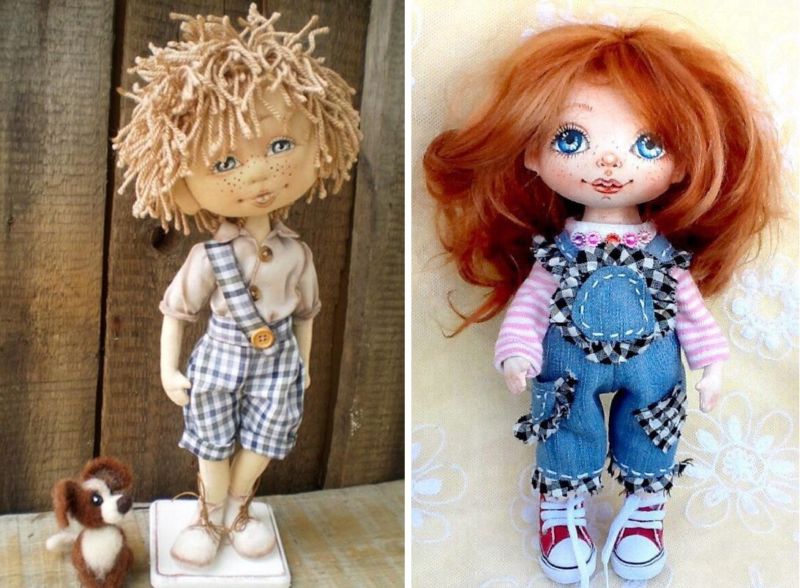
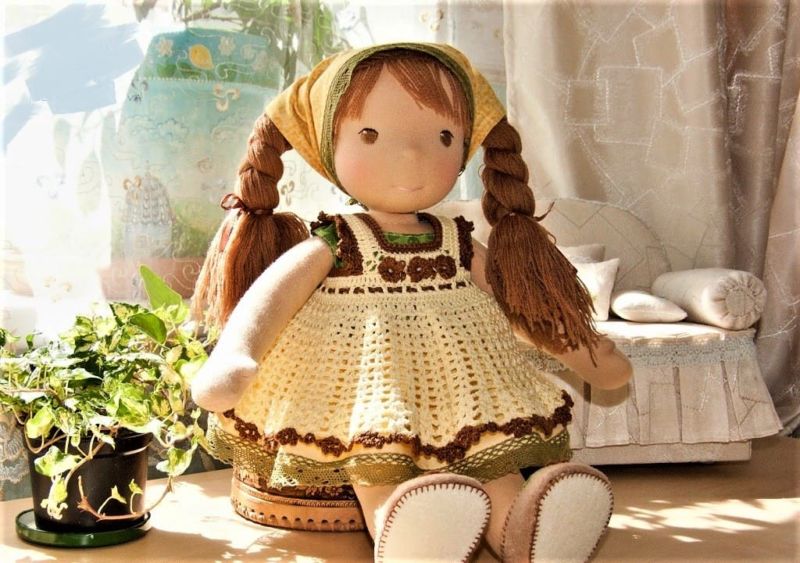
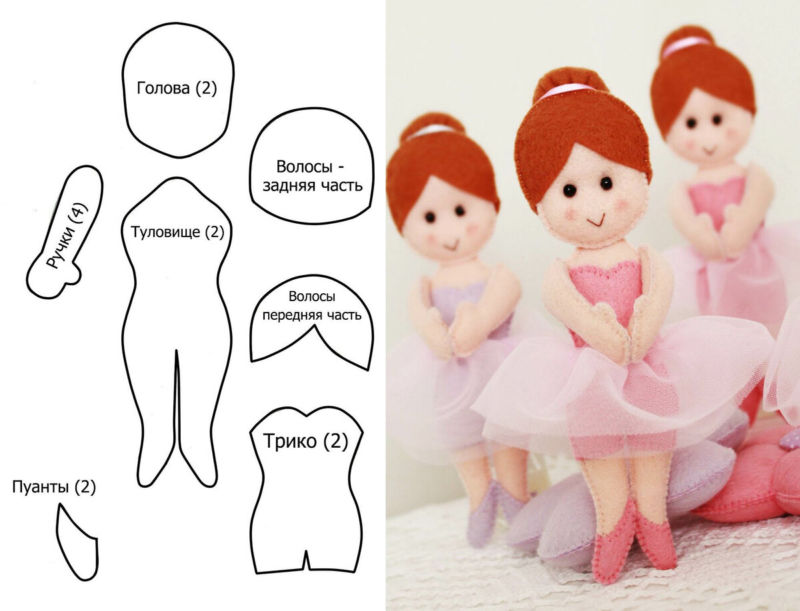
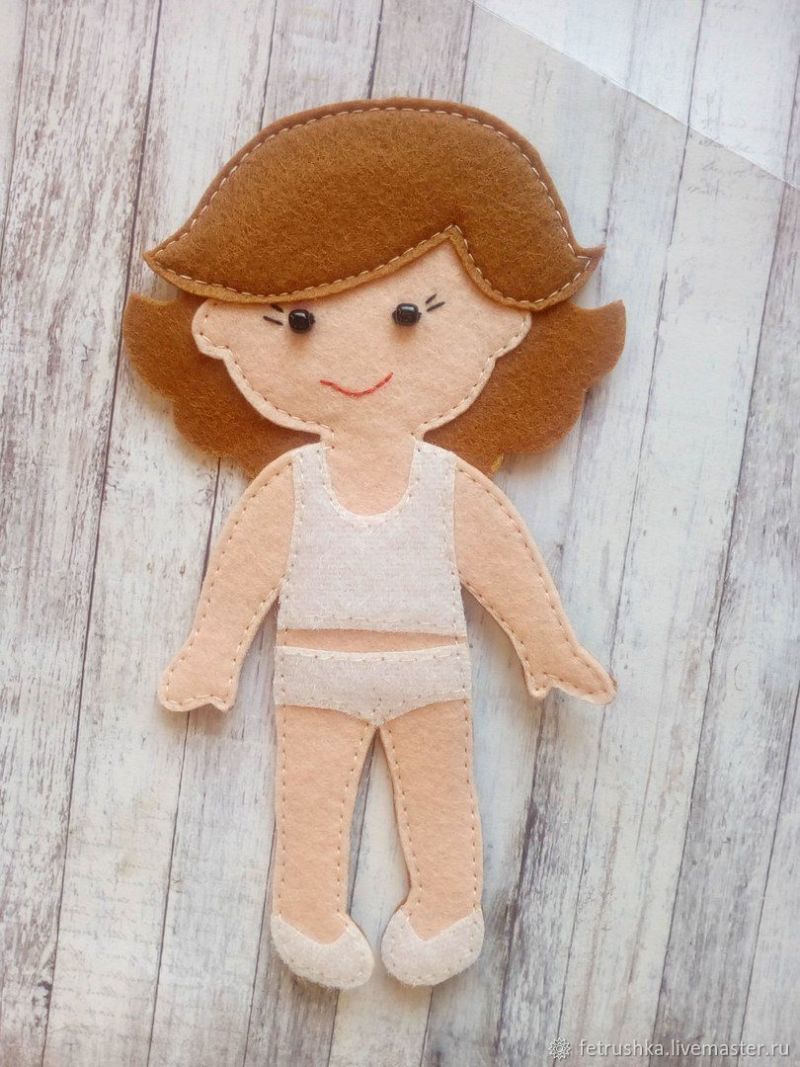
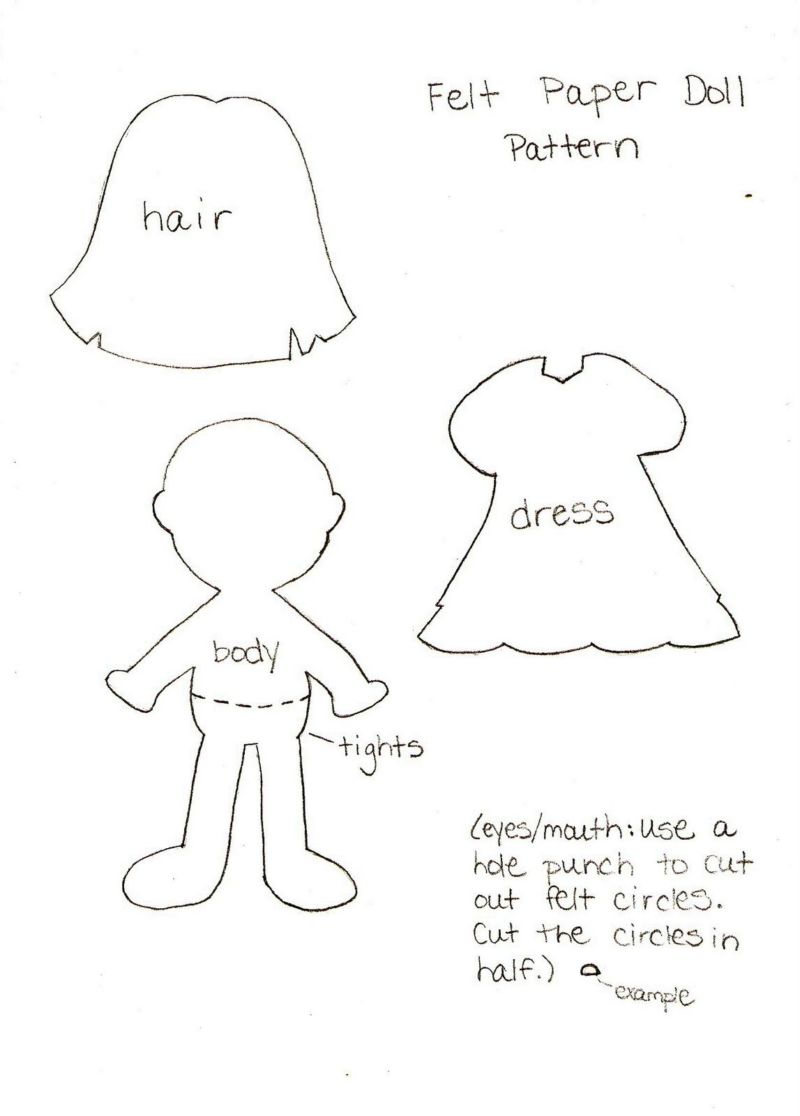
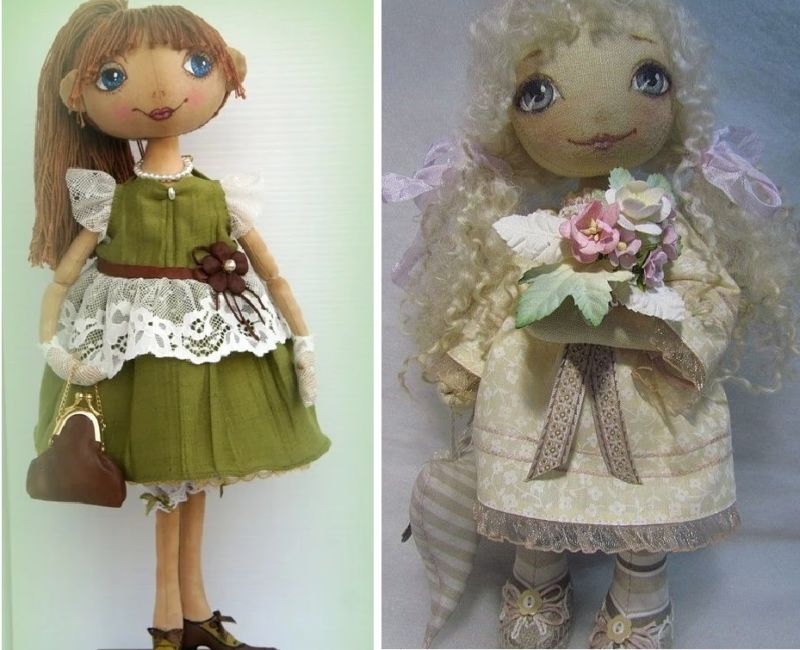
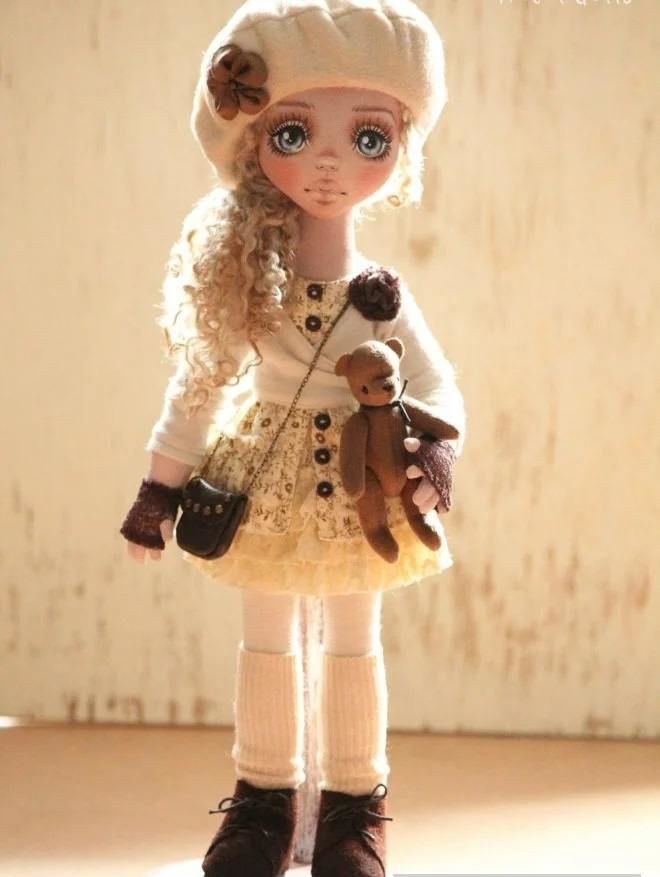
From felt.
Funny doll made of felt is very pleasant to hold in your hands: soft, gentle feel of felt will create a sense of peace and coziness. Such a doll will decorate the interior of your home. To work you need patterns, which are not difficult to draw yourself.
You will need:
- felt in any shades, flesh-colored for the body is mandatory;
- threads to match the color of the felt;
- stuffing: sintepon, absorbent cotton, small slices of fabric;
- safety pins;
- ready-made eyes from the store - 2 pcs;
- scissors;
- white chalk.
Description of the manufacturing process:
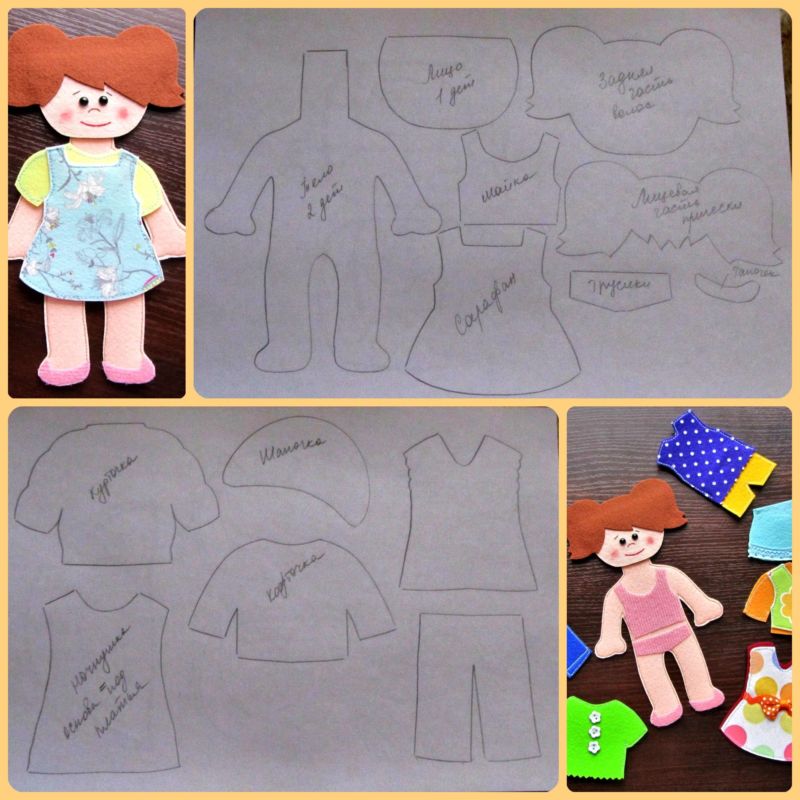
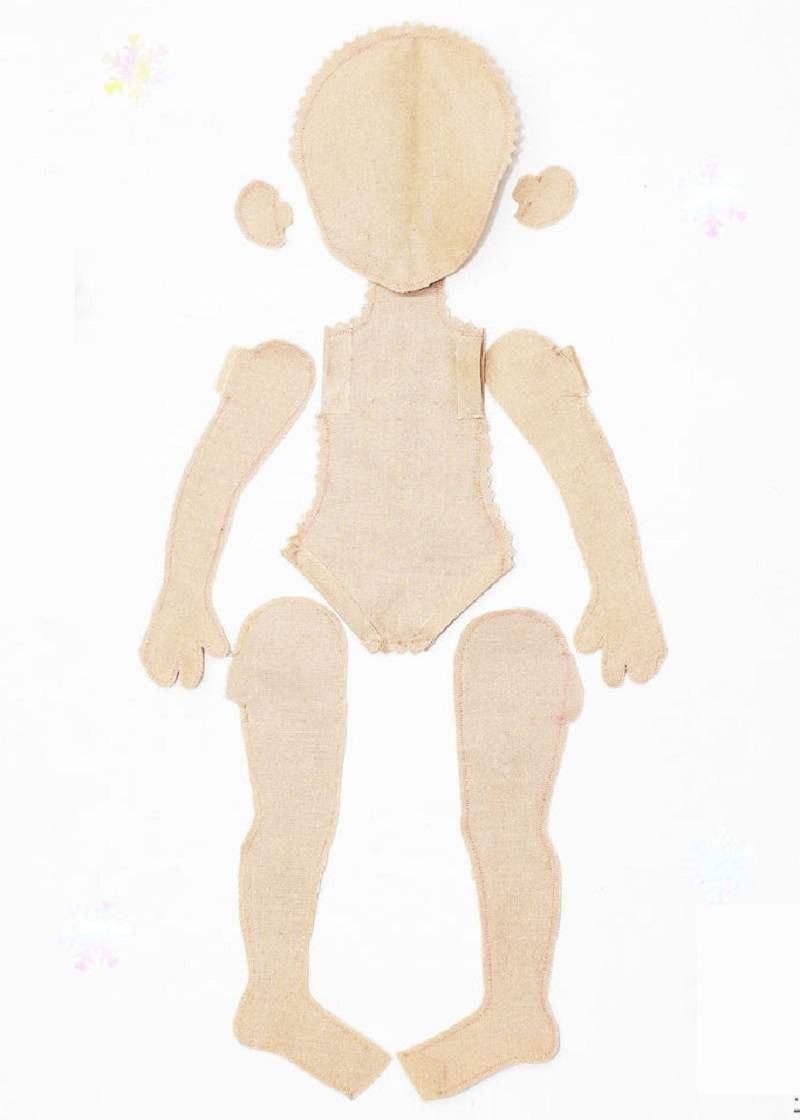
- Draw patterns of all body parts and clothing elements on paper, cut out.
- On flesh-colored felt in two layers with white chalk or washcloth outline the head with ears, torso, arms and legs with allowances for seams. Fix the outlines on the fabric with safety pins.
- Hair and bangs cut in one layer, ponytails - in two layers.
- Rectangle-dress - One layer. Circle — Sleeve — Also in one, cut in half, you get two sleeves. Shoes - 2 times in 2 layers.
- For the dress and shoes, florets and bows, take felt of any color you like.
- Sew the eyes on the front side of the head.
- Now sew the two parts of the head together, starting with the nadir area in a circle down. In the area Neck leave a hole, turn out through it the head, put inside filler.
- Push the padding into the ears can be a pencil.
- Everything is repeated with the remaining parts of the body. The filling of all parts of the toy must be even.
- A little filler and put in pairs of stitched tails. Attach the hair, bangs and ponytails to the head with PVA glue.
- Sew all parts to the body with threads in tone with small inconspicuous stitches.
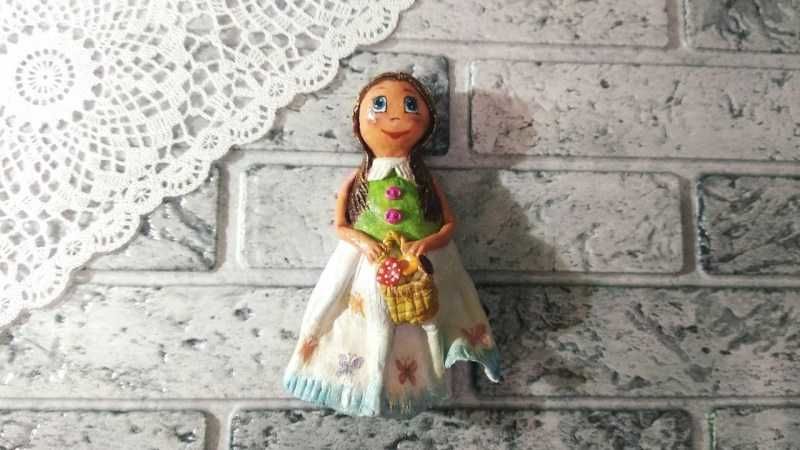
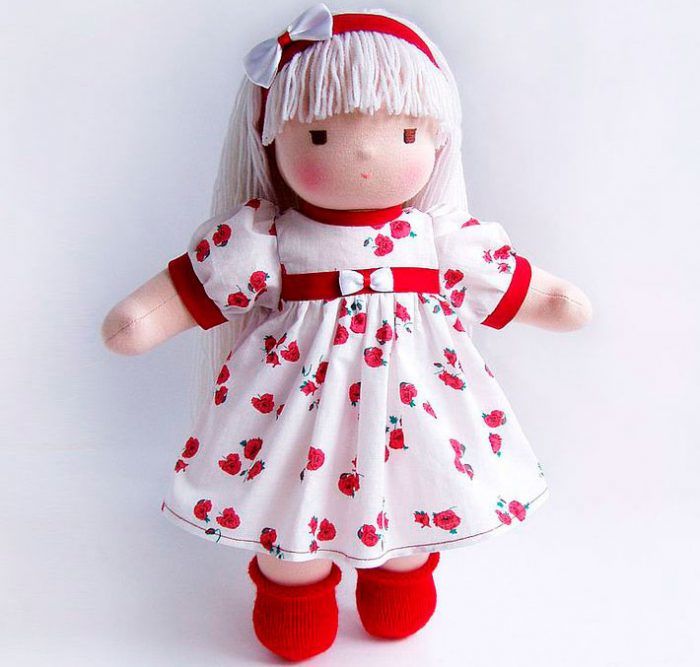
- Put on her shoes, a dress decorated with flowers, attach bows to the hair.
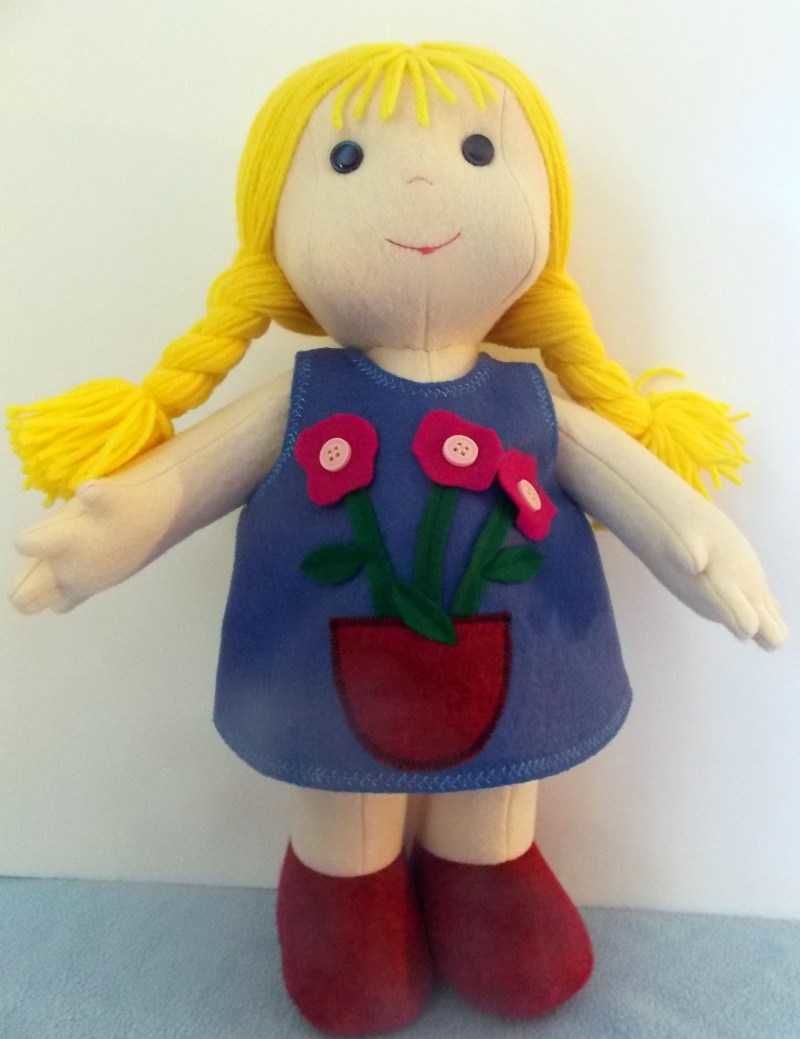
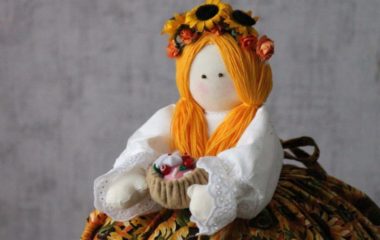
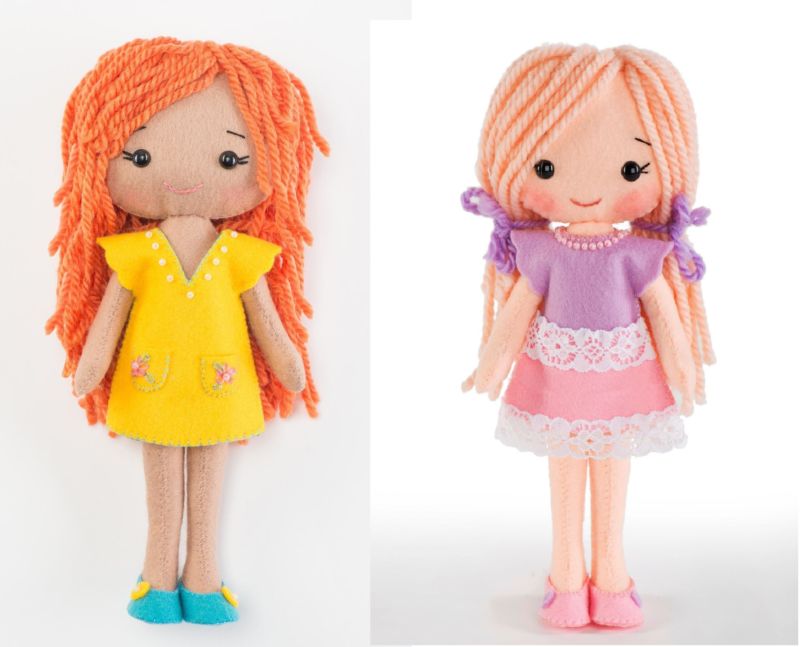
This doll's hair can be made from pieces of yarn - it will be a completely different image.

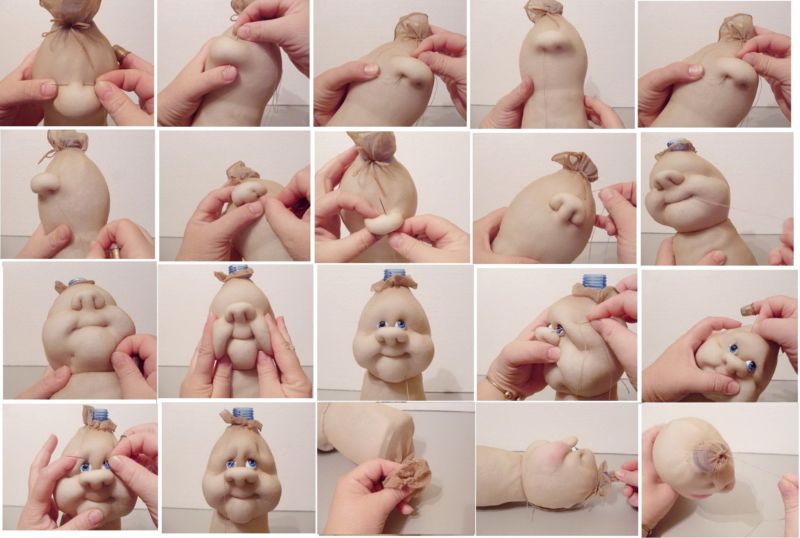
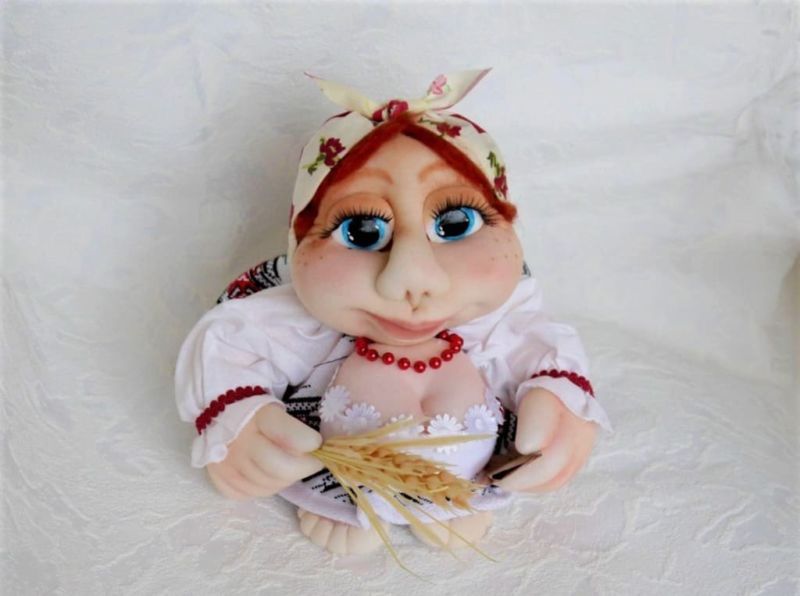
From kapron tights
The easiest way to create a soft toy out of kapron stockings. A cute little capron doll — doll can be made in just an hour.

You will need:
- capron stocking;
- synthetic material;
- needle;
- thread;
- doll eyes;
- cloth for a sundress.

Now let's get to work:
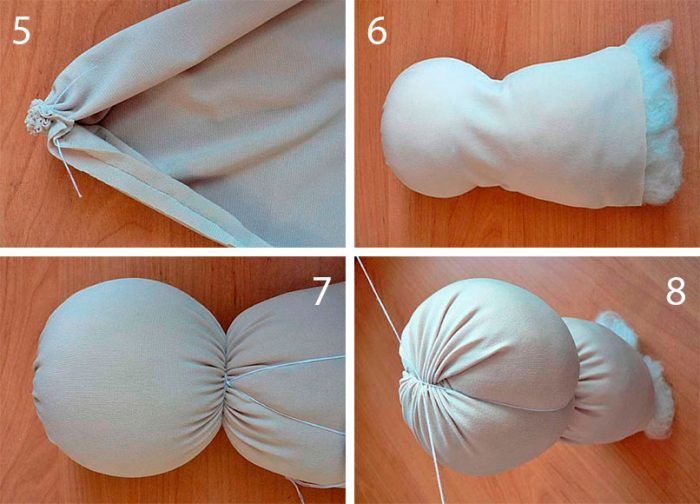
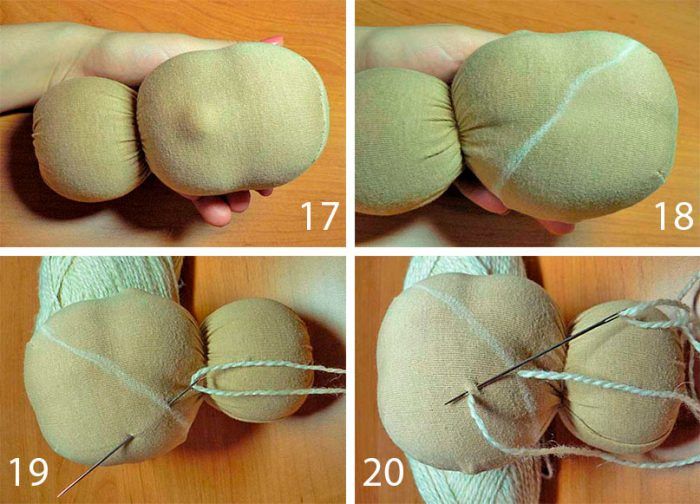
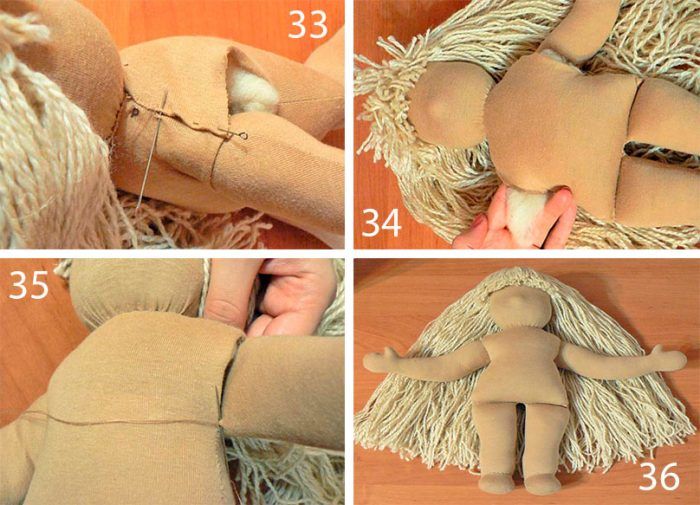
- Tightly stuff a medium-length capron stocking with white filler, such as absorbent cotton. Tie the open part Tie the open part of the sock with a thread of a matching color.
- Where the neck of the doll, wrap the stuffed shape thread 2-3 times and tie into a knot.
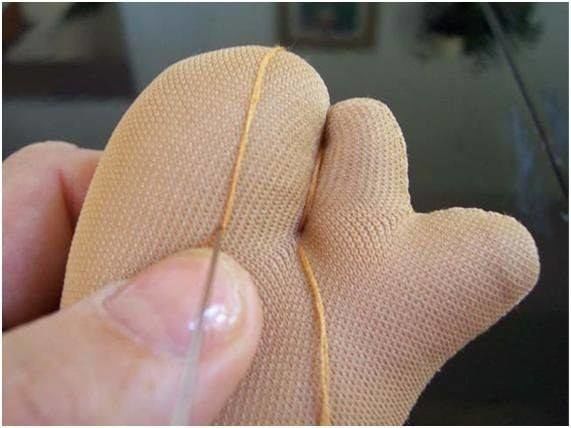
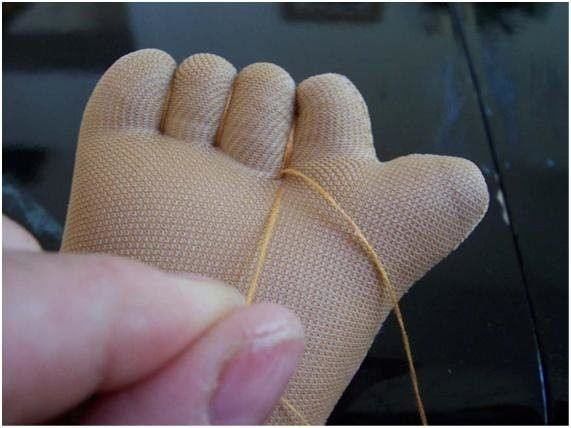
- To highlight the foot - grab fingers (in a pinch) part of the stuffed sock and tie it with string. Similarly, arrange the second leg.
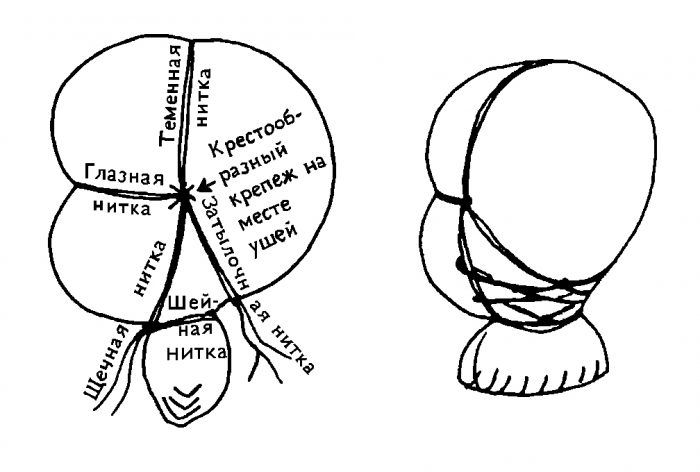
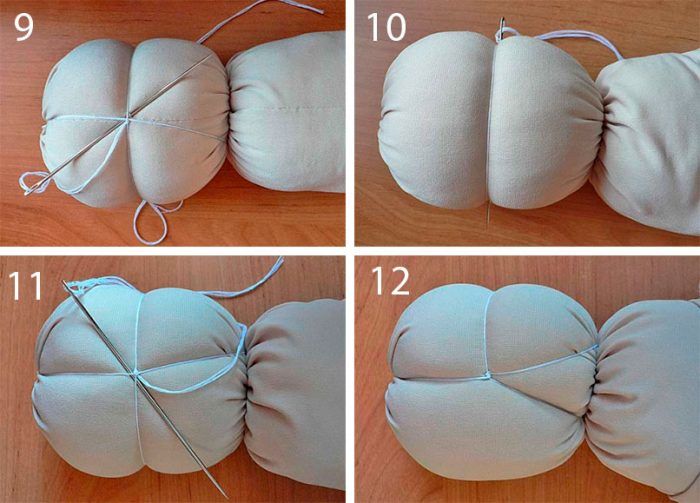
- In the middle of the bottom, on the seam of the sock, pierce the needle billet up to the tummy. There pull the needle and again stick a row. Slightly Tighten. You will get belly button. At the same time bring the needle back to the bottom seam of the sock, fix the thread there.
- Torso ready, let's form a face.
- Nose is formed in the same way as the legs, only a smaller ball is taken.
- Do the ears this way: grasp the stuffing with your thumb and forefinger on the left side of the head and pull together with a thread. Do the same on the right side — You get the second ear.
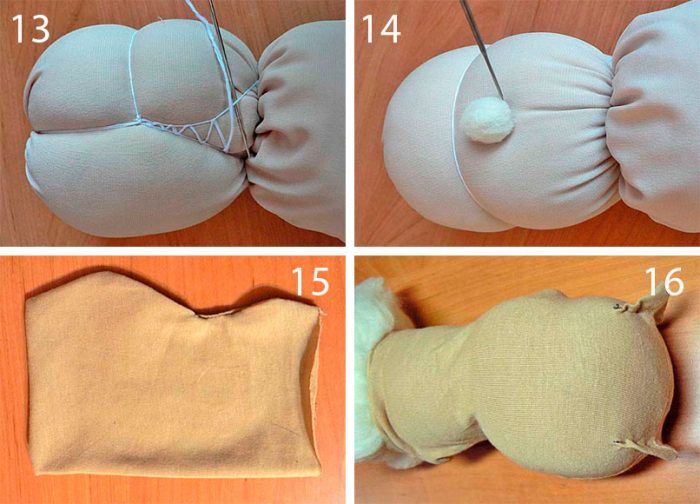
- Glue the eyes symmetrically to the face.
- Red thread stitch in the mouth area. Smile can still indicate an indelible red marker.
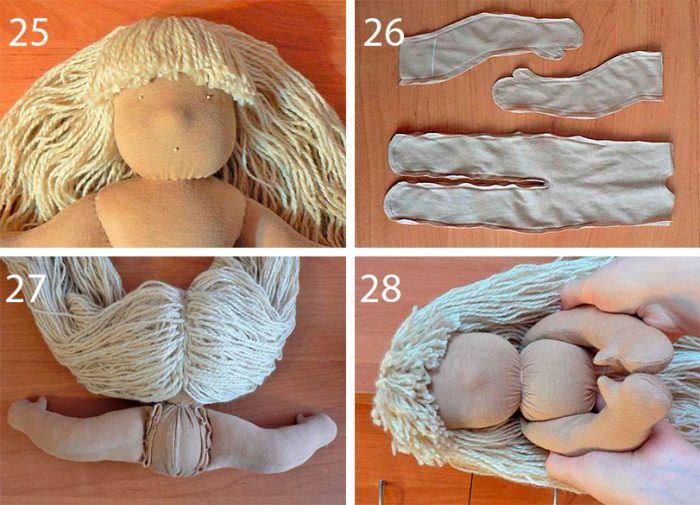
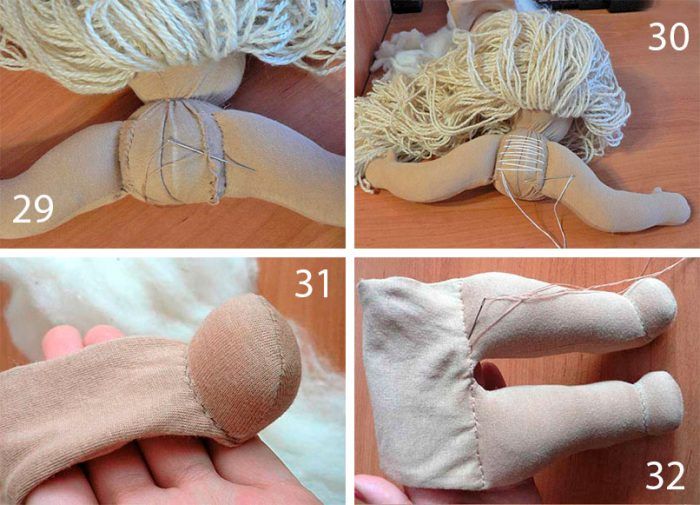
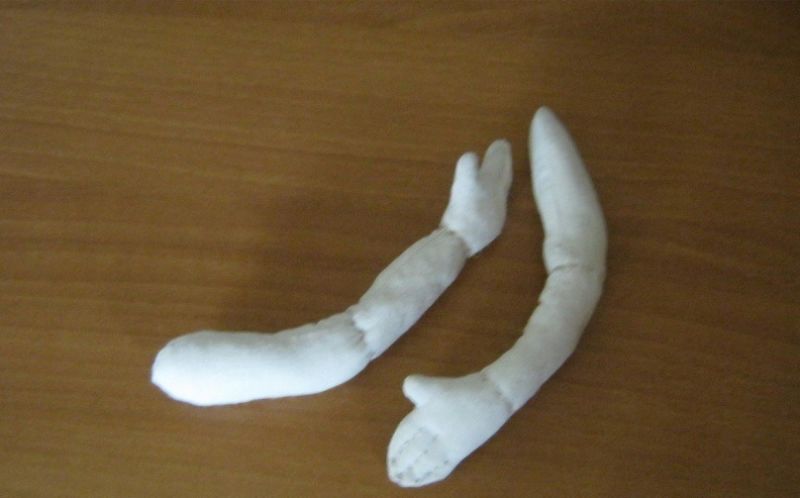
- Cut off the excess material from the top of a tied sock. Cut it into two equal parts. Both parts of the fold on the length and sew that came out two kapron "sausages". Fill them with absorbent cotton — Handles are ready. Sew them to the body in the right place.
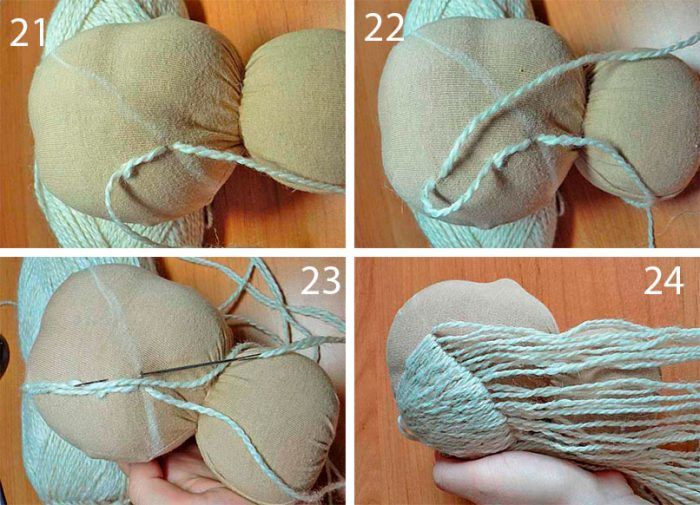
- If you want to make doll-girlAttach pieces of yarn to the head Hair from pieces of yarn to her head.
- Sew her clothes — A sarafan from a half-circle of fabric with slits for hands.
You have a wonderful doll!
The working thread and the capron The working yarn should be tightened more, for example, when you mark out the cheeks, but the navel can be slightly marked. Do not pull too hard, the working material can tear.
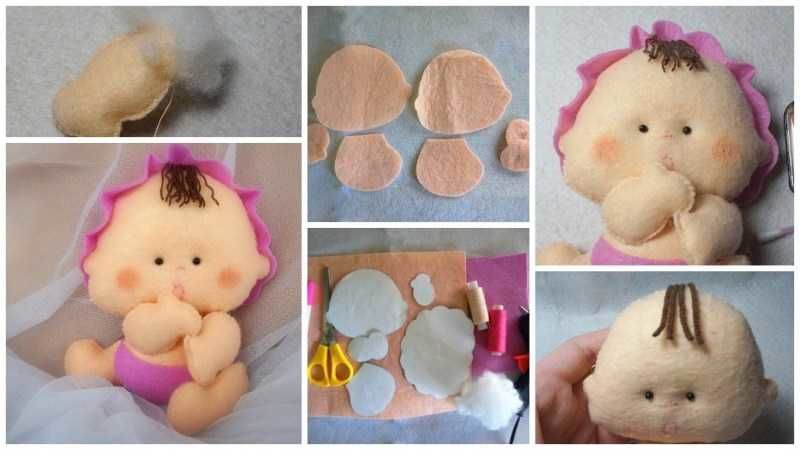
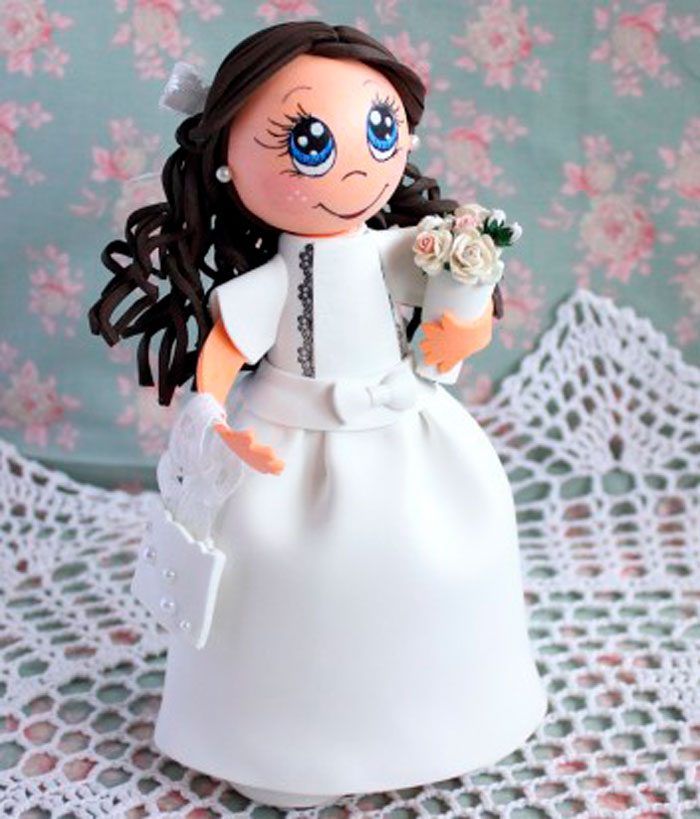
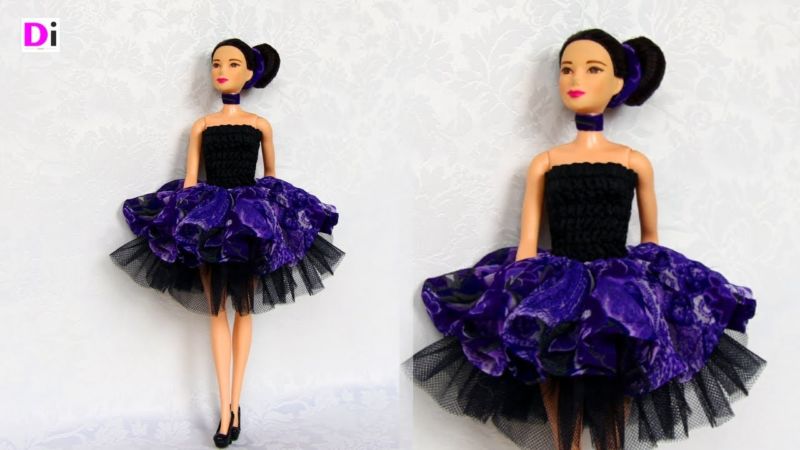
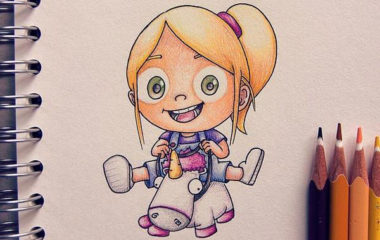
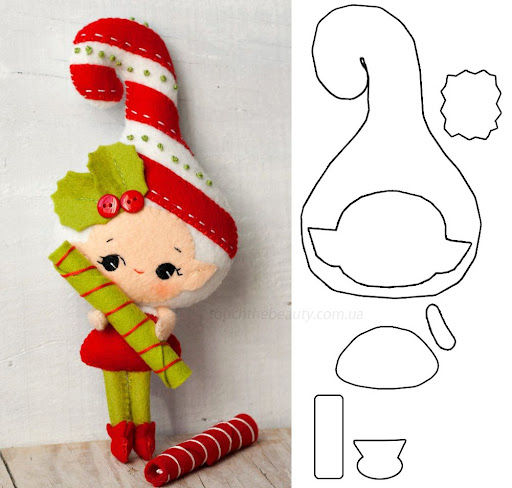
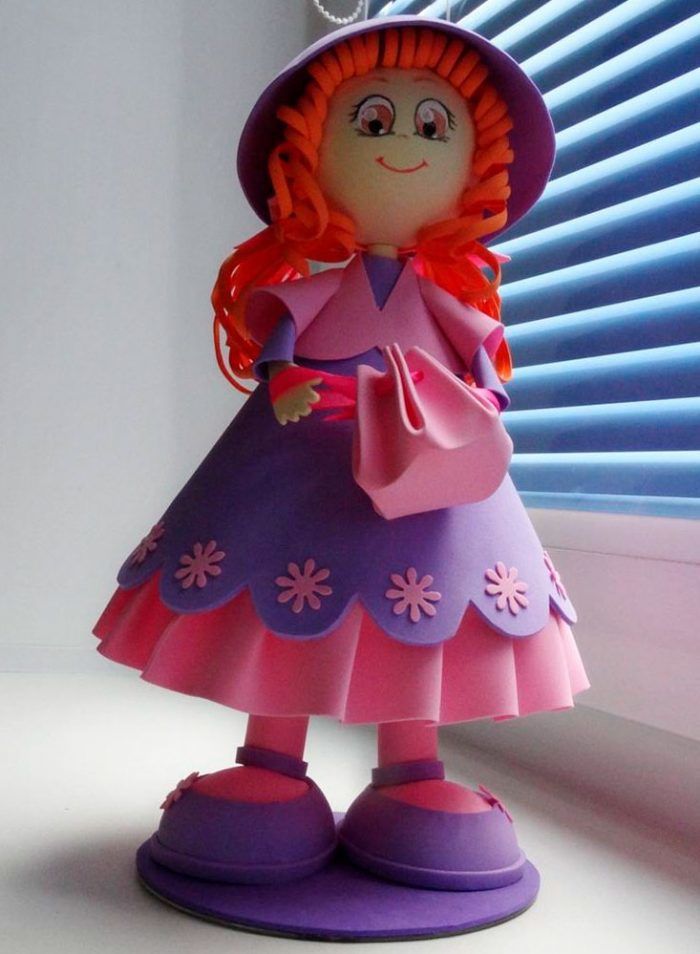
Foamirin
For imaginative designs, this is an excellent material Foamiran — Artisan foam. It also has names such as fom, Revelure, plastic suede.
You will need:
- two-millimeter foamiran flesh-colored, pink and purple,
- Styrofoam ball 5 cm in diameter,
- Styrofoam egg 6 cm long
- scissors,
- CD,
- skewer skewers,
- glue gun,
- acrylic paints,
- iron,
- box cutter,
- cup,
- toothpick,
- terry cloth.
Step by step instructions for making:
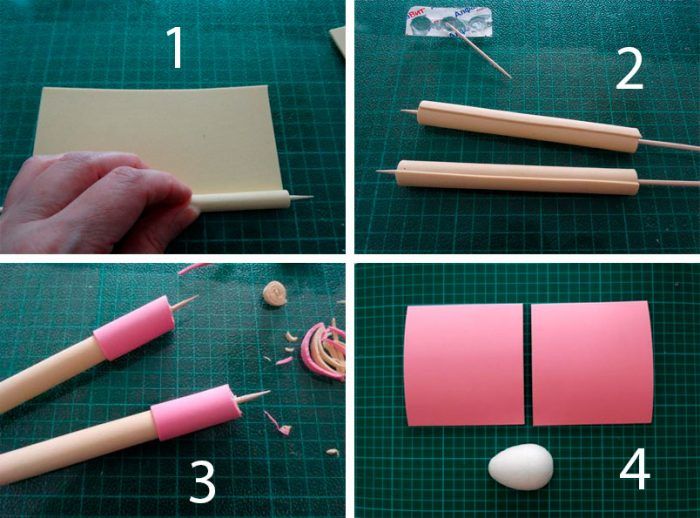
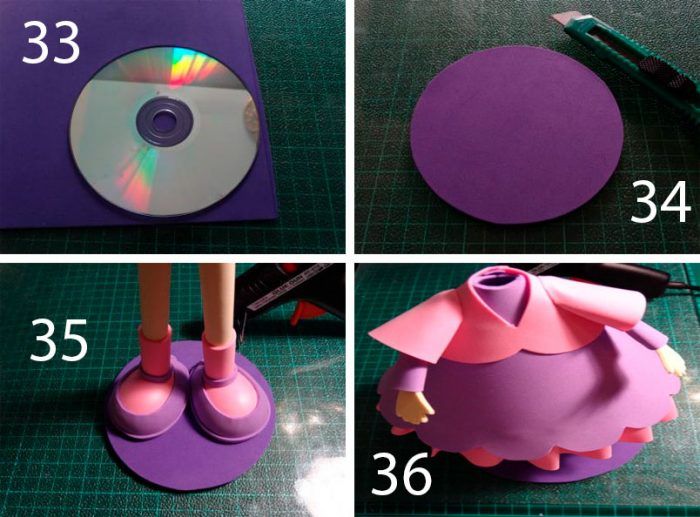
- For the doll's feet, you need 2 rectangles of Revelour Flesh-colored 14x11 cm and a pair of skewers. Twist them onto the skewers by the short side, glue the edges together.
- Pieces of pink plastic chamois — 6x4 cm rectangles glue on the legs — This will be the leggings.
- Trim the bottom of the legs to see the ends of the skewers.
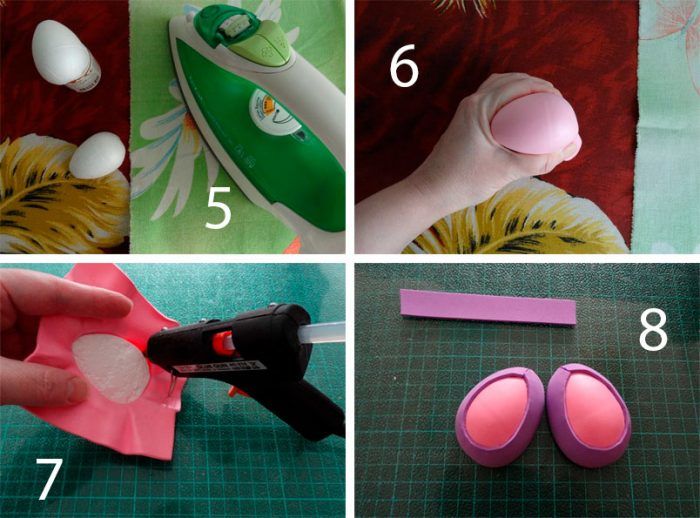
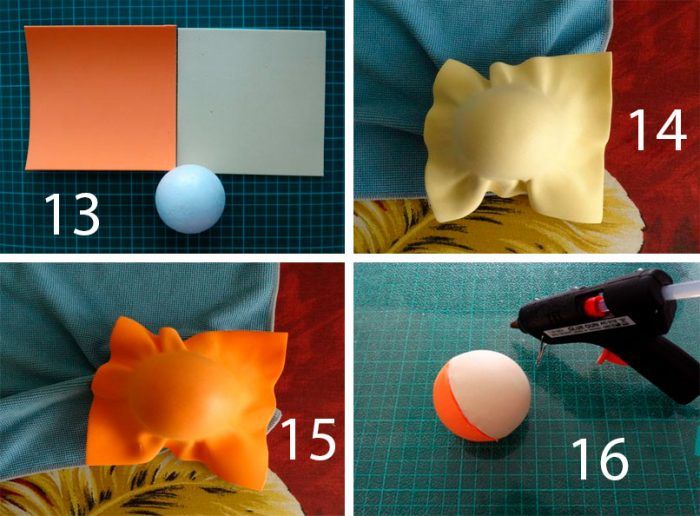
- To make the feet, divide the egg into two halves with a stationery knife. Place one half of the egg, flat side down onto a beaker of a suitable diameter. Cover with foamiran with a cloth, heat with an iron, and stretch over the future foot. Secure with hot glue, cut off the excess. Repeat the same with the second foot.
- Decorate them with strips of purple Plastic suede — Create a shoe.
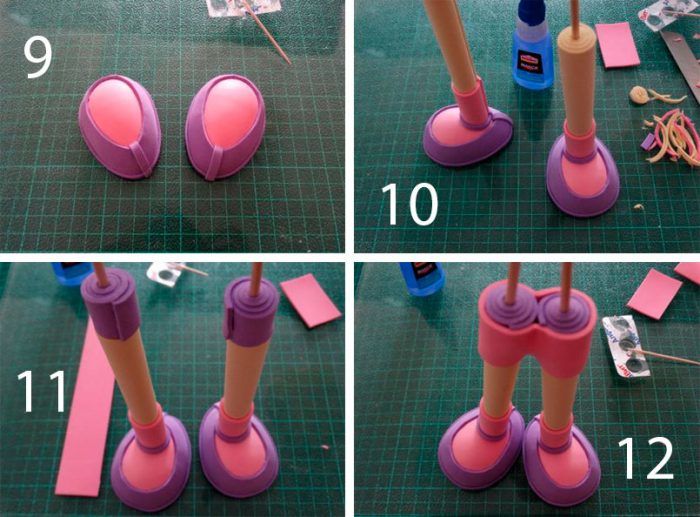
- Glue the foot pinsInsert them into the feet.
- Seal the knees with strips of purple Revelure, glue them together with pink fom и glue.
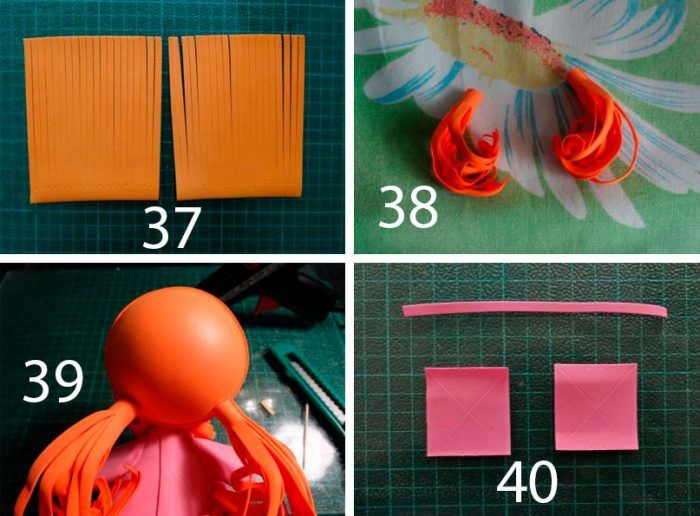
- For the head we take a ball of foam and square pieces of fom 13x13 cm square pieces of fom in flesh-colored and orange colors.
- Place the ball on the neck of the glass, put a Place a terry cloth underneath.
- Heat the orange foamiran as described above, apply to one side of the ball, remove excess, glue — it's hair. In the same way Foamiran Flesh-colored on the back side of the ball make a face.
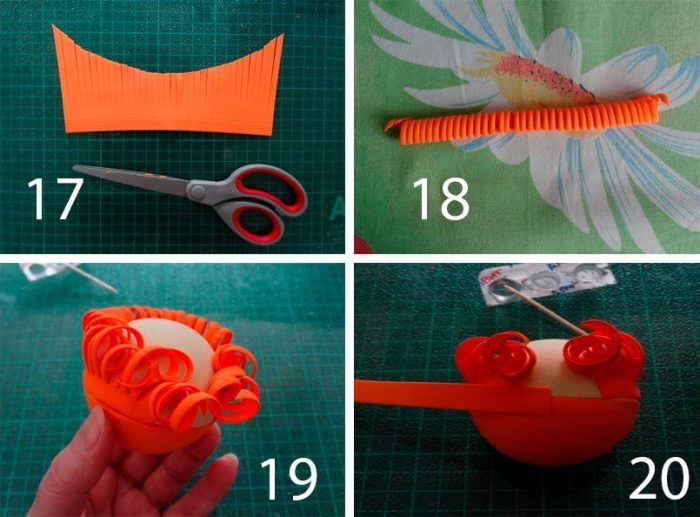
- A rectangle of orange fom. 10x18 cm. cut with scissors into fringe. Glue the hair on the back of the head, disguise the junction.
- Similarly, formalize the bangs.
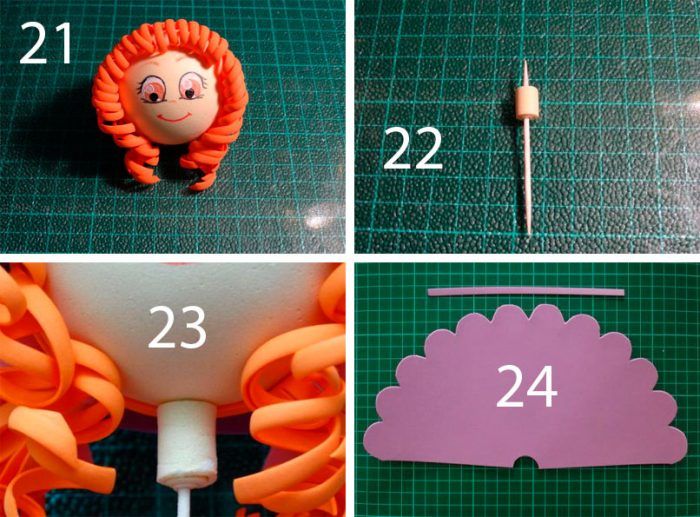
- Draw the eyes and lips.
- Strip flesh tone 5h1, 5 cm, wrap it on a toothpick, stick it to the bottom of the head, glue it, you get the neck.
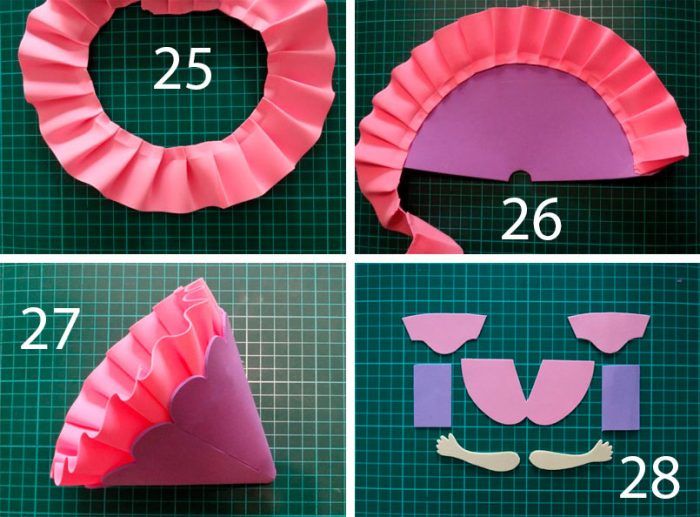
- Make details of the dress: a semi-circle of purple color with a radius of 10-12 cm (the edge of the semi-circle cut a wave) and a strip of pink fom Size 15x0,5 cm.
- Collect the folds on the pink RevelureAttach to the bottom of the purple semi-circle.
- Glue the cone-shaped dress, cover the joint.
- Cut out the arms of suitable size (small ovals with palms) of flesh-colored fom.. Wrap them, except for the palms, purple rectangles 3x5cm.
- Cut out of pink fom Cut a suitable size semi-circle with a notch for a collar on the round side for the vest And two smaller semi-circles for the sleeves.
- Wrap the vest around the top of the cone — dresses, and sleeves — around the top of the arms. Glue all the parts together.
- Decorate the disc with purple fom, trim off the excess.
- Glue the feet on the stand, the torso — On the legs.
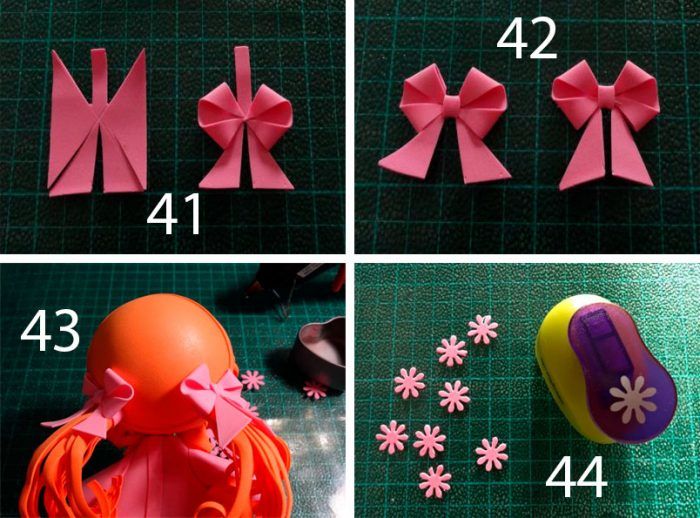
- The tails are made of orange Foamiran .Each of the two rectangles (10x12cm) cut, twist and roll into a tail. Fix them on both sides of the doll's head.
- Bows are made from squares of pink FoamiranBows are made of squares of pink foil, cut diagonally. Assemble the triangles from the resulting bows, glue them to the narrow strips — the bottom parts of it. Attach bows on the tails.
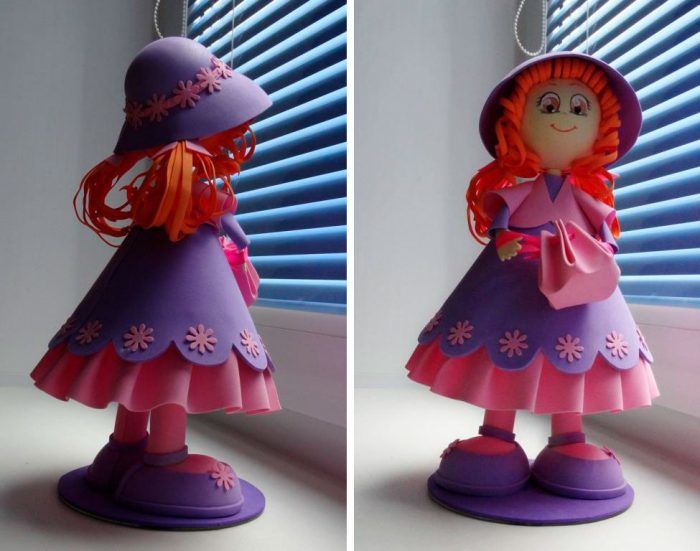
- Glue the hat from the semicircle purple fom.. Decorate the doll with beads.

Spectacular foaming doll is ready!
Doll Clothes
You can make dolls' clothes yourself, even if you can't sew or knit. Any fabrics or old clothes will do.
Dress and skirt out of fabric
Simple doll dresses are made like this:
- First, take the measurements: the length of the bodice to the waist, the length of the skirt of the dress, the chest circumference.
- We will make the fastener from "velcro".
- Then you need to cut out two different rectangles from the fabric: one smaller will be the top of the dress, the other — skirt.
- Process the edges of the rectangles.
- Cut through . Holes-sleeves The bodice of the dress, putting it on the doll.
- Assemble the skirt into pleats on one wide side and sew to the bodice.
- Attach straps to the bodice.
- Glue Velcro to both sides of the dress along its entire length.
To make a dress for a doll very quickly, you can do without making a pattern and do without sewing. Put the doll on a square piece of fabric, cut holes for the arms, tie it with a belt - the dress with a scoop is ready!
Sew a doll skirt even easier. Measure the circumference of the waist and the length of the skirt. Cut a rectangle of the desired size for the skirt and a strip for the belt. Finish the skirt on 3 sides with a finishing stitch, assemble it on the fourth side, and sew the belt to it. Attach a velcro fastener around the edges of the finished skirt Velcro the edges of the finished skirt ..
And if you take rectangular pieces of fabric for the skirt and waistband slightly longer than the measure, you can do without velcro — Tie the skirt with a sash.
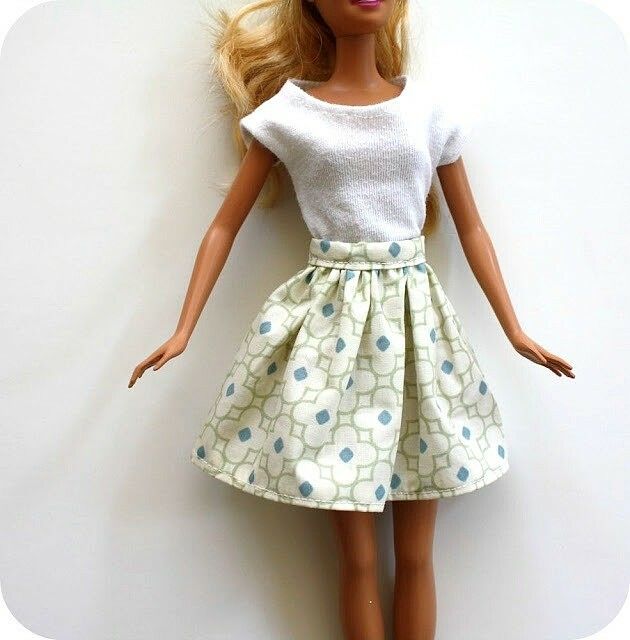
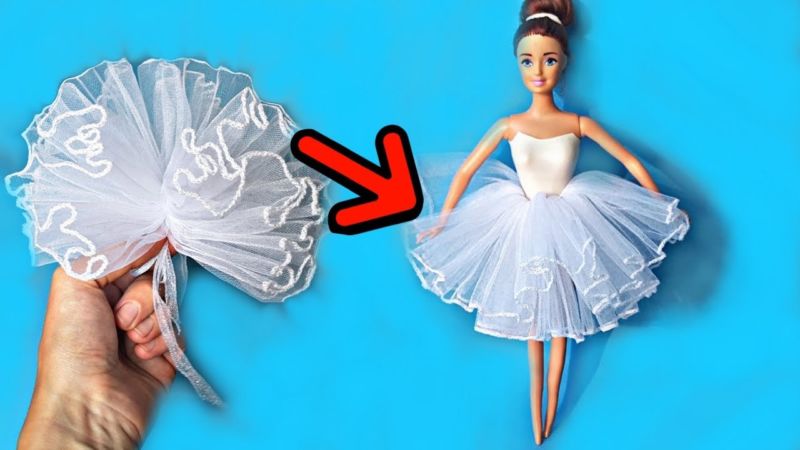
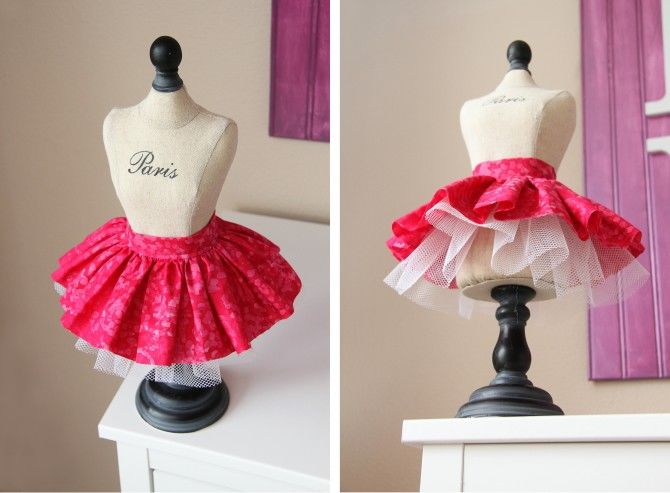
The skirt can be straight and fluffy, long and short, strict and decorated. Imagine and act out your fantasies!
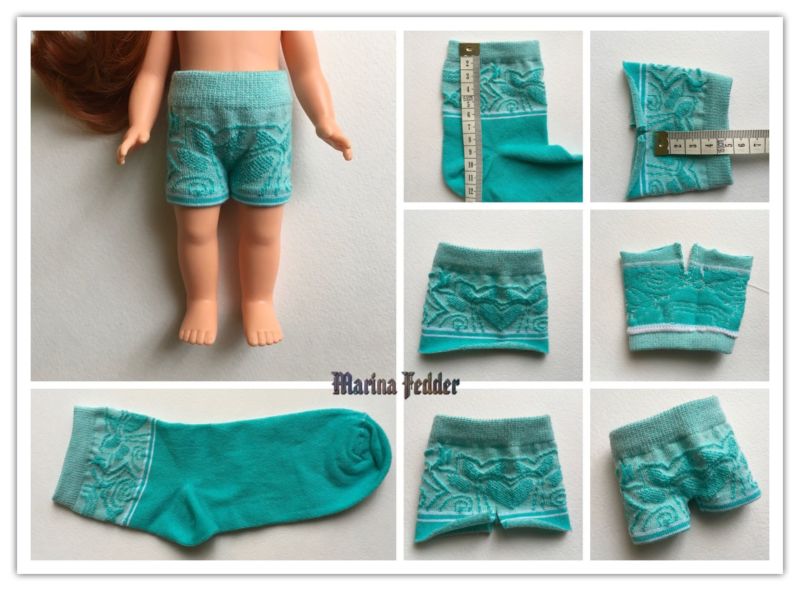
Sock Clothing
Unwrapped old socks — A great material for wonderful doll things:
- You can make a skirt or top out of the rubber band of a sock.
- Add to the rubber band also the top part of the sock, we get a dress with open shoulders.
- Take a sock - your doll's dress — maxi.
- Cute hats or blouses — Sleeveless sleeves with slits for the head and arms come out of the sock.
- А from the heel make hoods or unique collars.
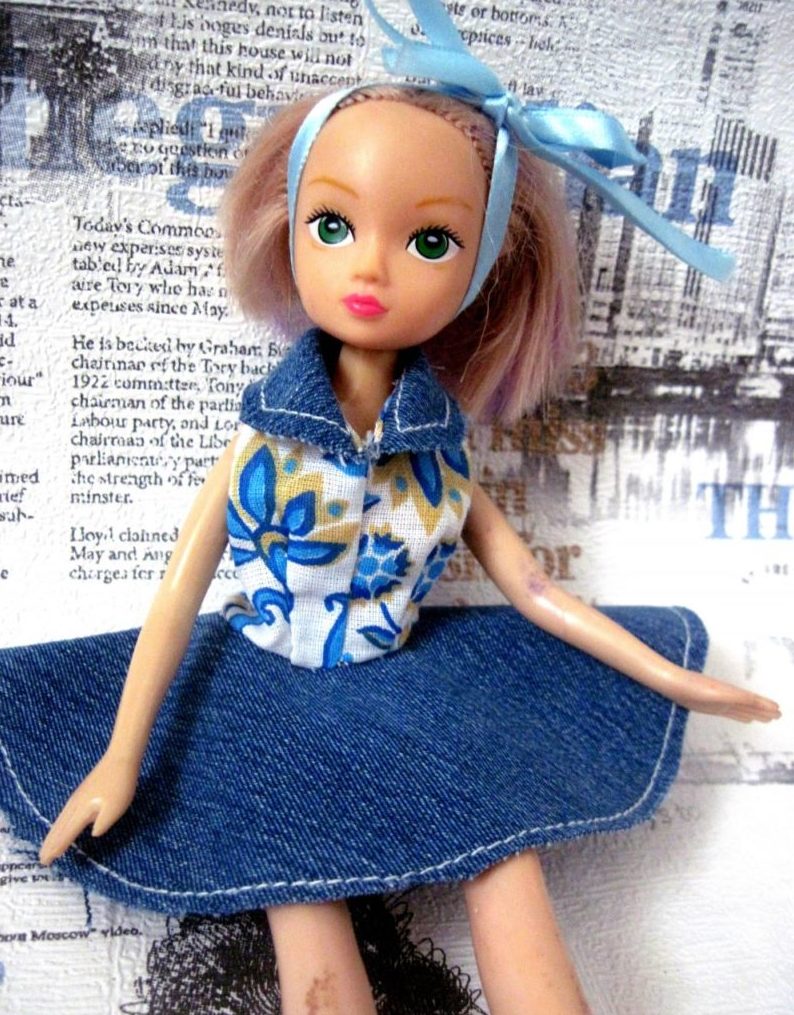
From old things.
As clothes for dolls, you can adapt clothes that children have already grown out of. If the doll is large or medium-sized, just a little bit of sewing on the used clothes.

Try it on the doll beforehand and mark the places where you will sew.
But even if things are much larger than the doll, you can take some of its parts: collars, sleeves, etc., which have trimmed edges, they are decorated, already have a clasp, with a knitted rubber band. This will help to reduce time and effort spent on making clothes, and the result will please.
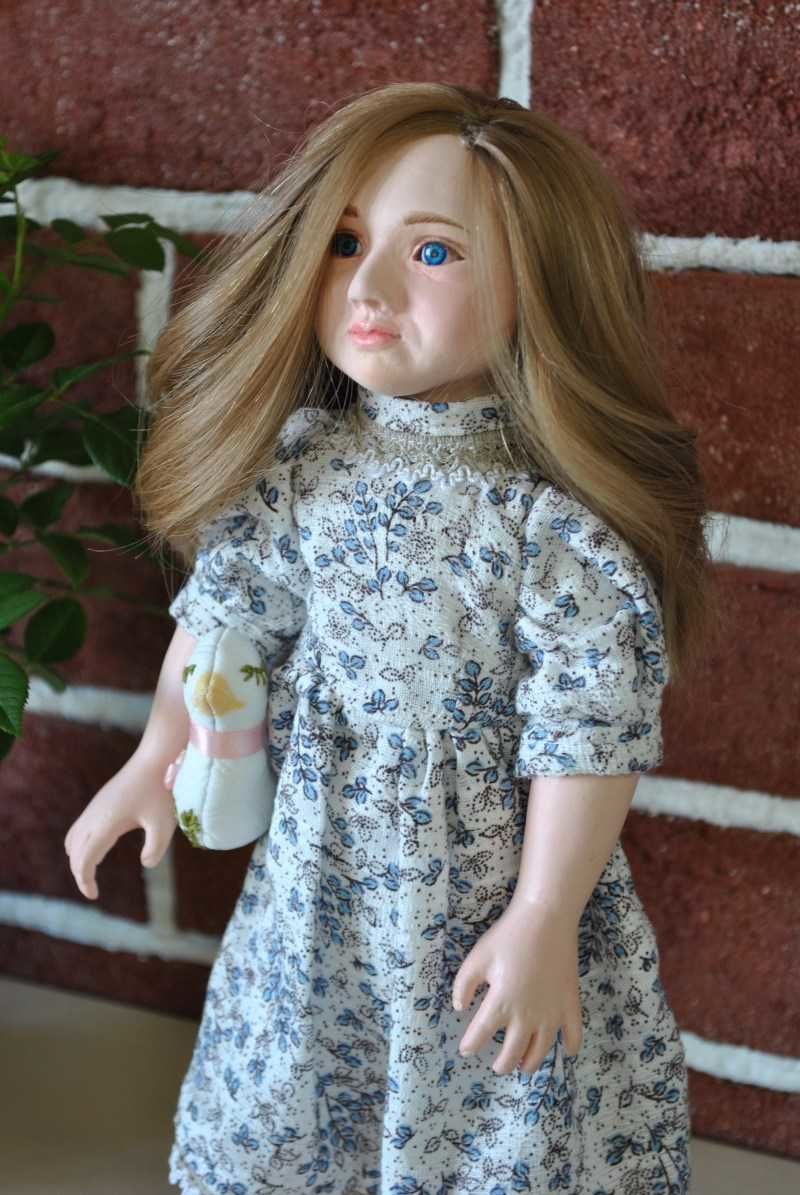
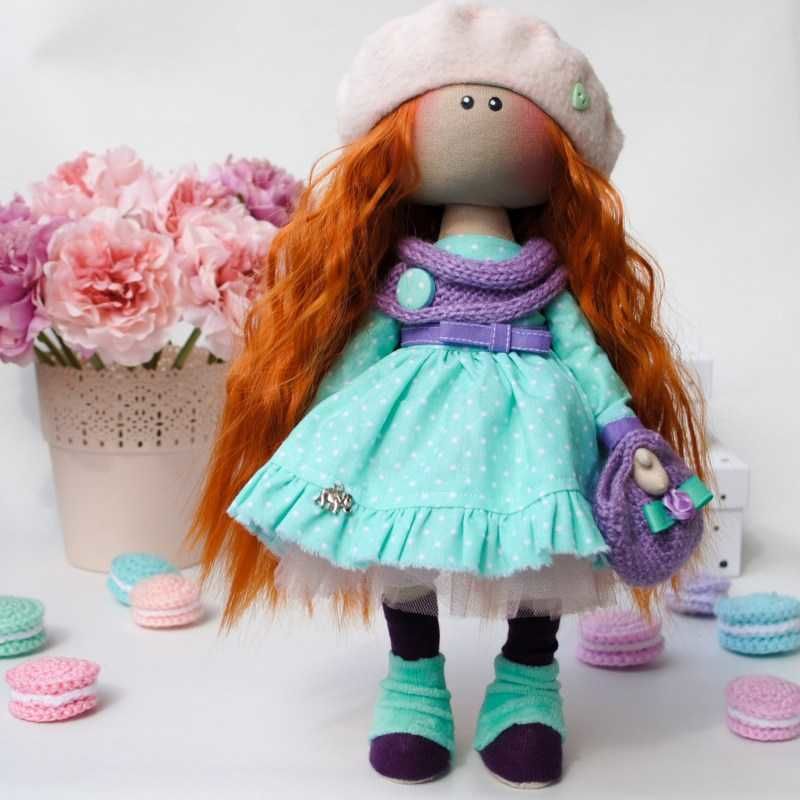
As you can see, making dolls and their clothes yourself — is a very creative and exciting process. Demonstrate diligence, give free rein to your imagination. And you are sure to come out a unique creation.
Photos of homemade hand-made dolls