Patchwork: Features of Techniques and Easy Schemes for Beginners
Various techniques of sewing from patches of fabric are once again gaining popularity. Both beginners and experienced needlewomen are attracted by the very idea of creating an exclusive, creative, but at the same time usable for household and everyday purposes product.

It can be:
- an interesting handmade bedspread;
- an element of designer clothes;
- accessory;
- And how warm and cozy would look gloves, napkins or warming mantle for a kettle;

Such things can be a worthy gift that will be appreciated and remembered with gratitude for a long time.

Nowadays, there are ready-made patchwork kits available for sale. They are equipped with all the necessary tools for creativity, inserts with descriptions of interesting ideas, patterns with explanations of the scheme of work.

A visit to a department in some mall specializing in the sale of products for various creativity is a must.

Techniques of patchwork sewing
To master the skill of patchwork sewing is best from the simplest techniques, as:
- Traditional - the basis is a canvas fabric. On its surface on the wrong side are applied to each other stitched patchwork. The pattern made up of pieces will be the front side of the product. In this way it is easy to design a thin blanket, bedspread, gloves or heat retaining capes on the kettle;
- Quick squares are the simplest version of patchwork for beginners. Prepared in advance, square multi-colored pieces of fabric are stacked in a certain pattern. You will quite quickly make a different kind of bedspread or capes on country furniture - sofa, chairs or stools;
- Strip on strip - colorful sections of strips can be connected in any way you like. It can be spiral or zigzag forms, as well as horizontal or vertical directions. Soft pillow, sewn in this way will give a cozy and comfortable feeling of your home;
- Magic triangles - if you are making your first steps in this interesting creative activity, start by using isosceles triangles. They are easier to stitch together and create an ornament. Next, you can complicate the product, and give a pattern similar to the kaleidoscope pattern from your childhood.

Features of the patchwork style
The idea of creativity in the patchwork style is to alternate individual fabric patches of both the same and different shapes and colors, the same applies to the type of fabric.

Depending on the intended scheme of ornaments or patterns are divided into a couple of types:
- Classic - ornament, pattern, the pattern of this type should have a clear symmetry. As a rule, a classic patchwork is composed of patchwork, which have the same size and shape. Colors, colors and patterns are allowed to varied. It is important to combine them with each other and the presence of a single semantic picture;
- Crazy patchwork - looks like a modern trend of this style. Its peculiarity is the absence of symmetry of lines and ornaments, as well as any sequence of patterns. In the work are used scraps of various shapes and sizes. At the same time experienced needlewomen create multifaceted, fancy patterns with ethnic motifs.


The choice of the ornament is determined by imagination and desire of the performer, as well as relevance to this product. The basic elements that are used as the basis for all schemes are:
- Square shapes - usually the basis of any ornament;
- isosceles triangles - form a direct pattern, are often the components of large squares with a duplicating motif;
- Stripes - are used as the same or different widths. Depending on the pattern can be connected in parallel or at an angle. In complex patterns, stripes are successfully combined with different elements of the ornament;
- Honeycomb is a very interesting ornament, consisting of six or eight angular shapes.

Patchwork sewing for beginners: easy and beautiful patterns
There are two most popular ways of sewing. And option No 1 is the "pizza" technique.

Let's consider the simplest technique of patchwork for beginners, because of its multi-layered nature and the possibility of using scraps of all types and sizes, it is called - "pizza".

The convenience of this option is the absence of any rigid or specific scheme, and the ability to use unnecessary pieces of fabric of any size:
- We take a piece of fabric of the desired size of the finished product;
- Lay out the scraps in an absolutely arbitrary pattern;
- We put a layer of thin organza on the front of the product;
- Iron thoroughly, but carefully, so as not to spoil the organza - a steam iron will do nicely;
- Lay out another pattern of scraps;
- Cover the second layer of patchwork with the same organza;
- Stitch the whole pattern on the sewing machine with strong threads;

In this way you can make cozy and economical bedside mats or covers on stools.

Option No. 2 is the boro technique. It is also an uncomplicated technique with a simple and accessible scheme, very convenient for beginners.

Ethnic boro fashion is considered a very interesting example of an applied technique. Its essence is the imitation of darning scraps of cloth and rags.

Making things in this style will require time and perseverance, because each patch has to be sewn by hand. But in return you will get a unique and very decorative product.

Try turning the most common bag into a designer piece of closet:
- Cut randomly shaped rectangles and apply them to the front of the bag;
- hand-stitch each piece;
- straighten and smooth out with a steam iron over gauze or thin cloth;
- you can add various details in the form of a brooch or sew on some large beads.


Now let's look at what products can be created using this technique.

Gloves
Gloves are deservedly considered a necessary addition in every kitchen. The tasks of oven mitts in use are quite simple - they should be an effective insulator and at the same time look nice and tidy.

It is clear that the gloves of a clean housewife must be clean. At the same time it is very difficult to wash hand towels and oven mitts, because they "take up" a large part of the contamination.

More often it is much more rational to just change the glove that has lost its appearance with a new one.

Sew them yourself from scraps, using simple patterns, a fairly simple task. Time for production will not take very much. Of the material you will need only scraps of fabric.

Use a natural fabric, as the synthetic one will melt at high temperatures.

And despite the fact that in the sale there is a large selection of gloves, complete with a towel or mittens, sewn with your own hands, any thing will give the house comfort and personality.

Some tips for sewing gloves:
- If the fabric is loose, it is advisable to trim it first. Ideally, this is best done using an overlock.It is acceptable to use a standard overcasting stitch, hand stitching the fabric with a needle or sweeping the seams with a braid, hiding them inside;
- The tack is always hung on a hook, so don't forget to have one;
- Leave an allowance of 10mm. It will ensure the strength of the product;
- Do not write on the pattern with a marker or pen - marks do not wash out well and shine through on the wrong side;
- It is wise to sew the gloves in batches or in pairs, either of the same size or as a set of large and small gloves;
- Prepare the filling, which can be felt, and a braid for finishing;
- check the availability of sharp scissors, needles, pins, chalk and cardboard for patterns;
- Sew with a sewing machine or by hand;
- Don't throw away any leftover fabric-you may want to make something else in the kit;
- The shape of the tack can be anything - apple, heart and others;

A tack in the form of a square for beginners:
- Take a couple of strips of fabric 7x56cm. The square in the finished product is 5x5cm. With the allowance for seams, respectively, 7x7cm. The allowance of 2cm. is mandatory;
- From the strip should get 8 squares;
- Stitch the strips lengthwise and smooth out the seam;
- Two strips of fabric stitch together as evenly as possible;
- smooth out the seam itself in different directions;
- Perpendicular to the seam, draw lines - they will be the edges of the future squares;
- Cut in the center, not forgetting to leave 1 cm. on the allowances and seams;
- Take the first cut square and put it on the rest of the workpiece;
- Carefully align the seams in the center of the workpieces and stitch along the marked line;
- Cut off the excess fabric;
- Unroll the stitched - you should get a new blank of the four squares;
- Do the same with the remaining blanks;
- you should get four squares of four small squares;
- lay out the pattern of patches, making sure that the marked line on the wrong side is reversed in the direction of the intended seam;
- Stitch everything, you should have rectangles of eight squares;
- Assemble the rectangle, carefully joining the middle and side seams;
- Stitch along the same marked line;
- The more carefully align the seams, the more even the squares will look;
- Next, sew the two rectangles together;
- iron everything well again;
- Match all the seams and fix them with needles or stitching;
- draw the stitching lines - the width of the small squares in the picture should be 5 cm;
- Stitch and sew on a loop or decorate with bright stitching;


Let your cute gloves please the eye and facilitate the work at the stove.

Bedspread
Any technique of sewing a bedspread implies the need for painstaking work to come. But the result will more than pay for all the time and effort spent.

Even before you start work, it is important to provide the necessary tools and fabrics. And if there is a need, buy the missing items.

Check availability and working order:
- Sewing machine - to sew by hand such a large product as a bedspread is very problematic, and the stitches will be much neater and the seam is smoother;
- In this work necessarily use an iron for ironing the seams;
- Scissors are better replaced by a roller knife, it will simplify the work as much as possible;
- Various templates, if you plan to make an ornament;
- Squares - preferably made of natural fabrics, with a size of 25x25cm. We will need 20 pieces;
- sealing fabric, you can fleece - a piece with the size of 105x130cm;
- The fabric, which will go with the inner side - 105x130cm;

The process of creating a bedspread:
- arrange the squares 5 pieces by 4 pieces, combine them by pattern or color;
- Start sewing a multicolored patchwork bedspread by making strips. Fold the squares facing each other;
- start stitching the sides of all pairs on the right side of the pile;
- Now stitch the squares on the other side;
- Check the neatness and congruence of all lines;
- join all the strips into one piece;
- Iron all seams, if necessary, iron with steam;
- overlay our colorful piece on the sealing fabric, they should have the same shape;
- lay out the blanket bottom piece on the sealing piece and on top of the squares blanket;
- Fold the three-layered blanket and stitch it, do not forget to leave an open area;
- Turn out the piece, iron and darning the remaining area;


Our tip - as the bedspread is layered, be sure to quilt it.

Different Patterns
Patchwork for beginners with its variety of schemes and drawings is better not to compose yourself, especially if you only master this kind of applied technique.

Try to choose ready-made, not too complicated. Believe me, your product will not suffer from this, but the result will be quite predictable, and you will get what you planned.

Take advantage of the schematic images of products offered in needlework magazines and specialized sites. Even in ready-purchased kits on creativity and handicraft you can find inserts with useful information and specific tips.

The general plan for creating a pattern will look like this:
- Laying out the scraps in a matched pattern;
- sewing the patchwork into separate blocks;
- stitching the blocks together into a solid fabric;
- joining the lining fabric and the variegated cloth;
- quilt the entire garment as needed.

The choice of pattern itself should be determined solely by the desire and skill of the artist, her experience and preference for a particular technique. That has already been described here in detail.

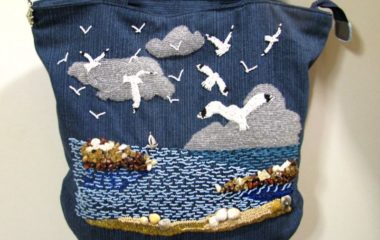
Patchwork sewing out of denim
Let's talk about the technique "craze", used in patchwork sewing from denim.

It is ideal for creating exclusive items of scrapped or simply boring things out of denim.

Using this technique, you can use a lot of details that will give a unique look to your product. It will be appropriate to use a variety of patterns and shapes.

Depending on the purpose of the product it can be:
- Decorate with buttons;
- embroidered with beads or rhinestones;
- Sew on ribbons, lace, labels and unusual pockets.

Since in this technique there are no requirements for the plot, it allows you to create truly designer things.

It is very important in doing so:
- Launder the material from which you plan to cut the piece;
- Iron and steam used items that have been neatly cut with an iron.

There are situations where there is no need to completely undo the original product. For example, if you are going to turn old jeans into breeches or shorts, adding accessories.

Another thing if you masters the original bag or backpack from scraps of jeans. Here you may need ready-made patterns or templates, you can rip an old thing and immediately sew to its size.

In addition, shabby skirts or vests are almost a classic.

Very effective look:
- chairs upholstered in denim;
- Soft cushions on a sofa or stools;
- Try making a bedspread - if you have a teenager in your family, it will be quite appropriate and practical decoration of his room.


Here it is appropriate to use any pieces of fabric from denim. The main thing is to sew everything together firmly and neatly.

In fact, there are many more techniques of patchwork sewing, we have shown you only the first steps of it. Gradually you will be able to add more details to your creations and combine several techniques at the same time.

We wish you good luck!


Photo patchwork ideas